過去記事
- WPF4.5入門 その1 「はじめに」
- WPF4.5入門 その2 「WPFとは」
- WPF4.5入門 その3 「Hello world」
- WPF4.5入門 その4 「Mainメソッドはどこにいった?」
- WPF4.5入門 その5 「全てC#でHello world」
- WPF4.5入門 その6 「WPFを構成するものを考えてみる」
- WPF4.5入門 その7 「XAMLのオブジェクト要素と名前空間」
- WPF4.5入門 その8 「オブジェクト要素のプロパティ」
- WPF4.5入門 その9 「コレクション構文」
- WPF4.5入門 その10 「コンテンツ構文」
- WPF4.5入門 その11 「マークアップ拡張」
- WPF4.5入門 その12 「その他のXAMLの機能」
- WPF4.5入門 その13 「簡単なレイアウトを行うコントロール」
- WPF4.5入門 その14 「レイアウトコントロールのCanvasとStackPanel」
- WPF4.5入門 その15 「レイアウトコントロールのDockPanelとWrapPanel」
- WPF4.5入門 その16 「ViewBoxコントロール」
ScrollViewerコントロール
ScrollViewerコントロールは、名前のとおり子要素がScrollViewerより大きな場合にスクロールバーを出して要素を閲覧できるようにするコントロールです。ScrollViewerでは、縦スクロールバー・横スクロールバーの表示方法の指定や、スクロール時に論理単位でスクロール(要素単位でスクロール)するか物理単位でスクロール(ピクセル単位でスクロール)するか指定できます。
ScrollViewerコントロールで使用する主なプロパティを以下に示します。
| プロパティ | 説明 |
|---|---|
| bool CanContentScroll { get; set; } | スクロールを物理単位で行うか論理単位で行うか設定します。trueの場合は論理スクロールでfalseの場合は物理スクロールです。デフォルトは物理スクロールです。 |
| ScrollBarVisibility HorizontalScrollBarVisibility { get; set; } | 水平スクロールバーを表示するかどうか指定します。スクロールバーを非表示にしてサイズをScrollViewerと同じ幅にする場合はDisabledを、スクロールバーが必要な場合にのみ表示する場合はAutoを、スクロールバーを表示しない場合はHiddenを、スクロールバーを常に表示する場合はVisibleを設定します。デフォルト値はHiddenです。 |
| ScrollBarVisibility VerticalScrollBarVisibility { get; set; } | 垂直スクロールバーを表示するかどうか指定します。デフォルト値はVisibleです。 |
| double ScrollableHeight { get; } | 子要素の高さを取得します。 |
| double ScrollableWidth { get; } | 子要素の幅を取得します。 |
| double HorizontalOffset { get; } | 水平スクロールバーの位置を取得します。 |
| double VerticalOffset { get; } | 垂直スクロールバーの位置を取得します。 |
ScrollViewerコントロールのスクロールバーの位置を表すプロパティは、読み取り専用になっています。そのため、スクロールバーの位置の操作を行う場合はメソッドを使用します。スクロールバーの位置を制御する主なメソッドを以下に示します。
| メソッド | 説明 |
|---|---|
| void ScrollToTop() | 一番上のコンテンツまでスクロールします。 |
| void ScrollToBottom() | 一番下のコンテンツまでスクロールします。 |
| void ScrollToLeftEnd() | 左端までスクロールします。 |
| void ScrollToRightEnd() | 右端までスクロールします。 |
| void ScrollToHorizontalOffset(double offset) | offsetで指定した場所まで水平スクロールします。 |
| void ScrollToVerticalOffset(double offset) | offsetで指定した場所まで垂直スクロールします。 |
ScrollViewerコントロールには、この他にも行単位のスクロールを制御するLine****メソッドやページ単位のスクロールを制御するPage****メソッド(****にはスクロール方向が入ります)や、タッチ操作にどう対応するかを設定するプロパティなどがあります。詳細は、MSDNのScrollViewerコントロールのページを確認してください。
ScrollViewerコントロールを使ってスクロールする画面を作成するXAMLの例を以下に示します。
<Window x:Class="ScrollViewerSample01.MainWindow"
        xmlns="http://schemas.microsoft.com/winfx/2006/xaml/presentation"
        xmlns:x="http://schemas.microsoft.com/winfx/2006/xaml"
        Title="MainWindow" Height="200" Width="300">
    <ScrollViewer>
        <StackPanel>
            <Button Content="Button1" />
            <Button Content="Button2" />
            <Button Content="Button3" />
            <Button Content="Button4" />
            <Button Content="Button5" />
            <Button Content="Button6" />
            <Button Content="Button7" />
            <Button Content="Button8" />
            <Button Content="Button9" />
            <Button Content="Button10" />
            <Button Content="Button11" />
            <Button Content="Button12" />
            <Button Content="Button13" />
            <Button Content="Button14" />
            <Button Content="Button15" />
        </StackPanel>
    </ScrollViewer>
</Window>
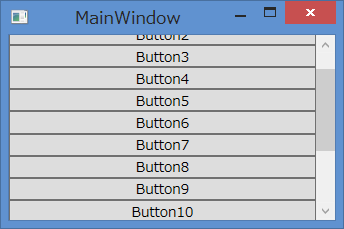
実行するとボタンが縦にならんで縦スクロールバーがあるWindowが表示されます。デフォルトでは物理スクロールなので、下図のようにボタンの途中でスクロールバーを止めることができます。

次に、論理スクロールを有効にして縦スクロールバーの表示をAutoにしたXAMLを以下に示します。
<Window x:Class="ScrollViewerSample02.MainWindow"
        xmlns="http://schemas.microsoft.com/winfx/2006/xaml/presentation"
        xmlns:x="http://schemas.microsoft.com/winfx/2006/xaml"
        Title="MainWindow" Height="200" Width="300">
    <ScrollViewer VerticalScrollBarVisibility="Auto" CanContentScroll="True">
        <StackPanel>
            <Button Content="Button1" />
            <Button Content="Button2" />
            <Button Content="Button3" />
            <Button Content="Button4" />
            <Button Content="Button5" />
            <Button Content="Button6" />
            <Button Content="Button7" />
            <Button Content="Button8" />
            <Button Content="Button9" />
            <Button Content="Button10" />
            <Button Content="Button11" />
            <Button Content="Button12" />
            <Button Content="Button13" />
            <Button Content="Button14" />
            <Button Content="Button15" />
        </StackPanel>
    </ScrollViewer>
</Window>
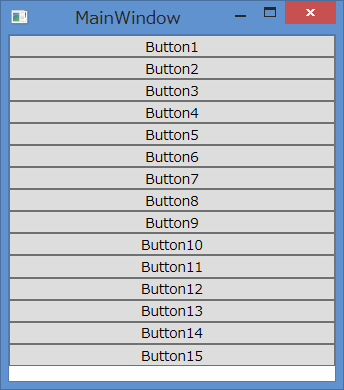
実行してスクロールをすると、ボタンの途中でスクロールバーを止めることができないことが確認できます。

縦スクロールバーの表示をAutoにしたので、スクロールバーが必要無くなるまでWindowを大きくするとスクロールバーが消えます。

次にScrollViewerコントロールのスクロールバーの位置を制御する例を示します。XAMLにScrollViewerコントロールとスクロールバーを動かす処理を起動するボタンを置いた画面を作成します。ScrollViewerコントロールはコードビハインドから使用できるようにx:Name属性を指定しています。画面の上部に置いているボタンにはClickイベントを設定しています。XAMLを以下に示します。
<Window x:Class="ScrollViewerSample03.MainWindow"
        xmlns="http://schemas.microsoft.com/winfx/2006/xaml/presentation"
        xmlns:x="http://schemas.microsoft.com/winfx/2006/xaml"
        Title="MainWindow" Height="200" Width="300">
    <DockPanel>
        <Button DockPanel.Dock="Top"
                Margin="5"
                Content="ScrollToHalfVerticalOffset"
                Click="ScrollToHalfVerticalOffsetButton_Click" />
        <ScrollViewer x:Name="scrollViewer">
            <StackPanel>
                <Button Content="Button1" />
                <Button Content="Button2" />
                <Button Content="Button3" />
                <Button Content="Button4" />
                <Button Content="Button5" />
                <Button Content="Button6" />
                <Button Content="Button7" />
                <Button Content="Button8" />
                <Button Content="Button9" />
                <Button Content="Button10" />
                <Button Content="Button11" />
                <Button Content="Button12" />
                <Button Content="Button13" />
                <Button Content="Button14" />
                <Button Content="Button15" />
            </StackPanel>
        </ScrollViewer>
    </DockPanel>
</Window>
画面上部のボタンをクリックすると、縦スクロールバーを中央に移動させるコードを以下に示します。
namespace ScrollViewerSample03
{
    using System.Windows;

    public partial class MainWindow : Window
    {
        public MainWindow()
        {
            InitializeComponent();
        }

        private void ScrollToHalfVerticalOffsetButton_Click(object sender, RoutedEventArgs e)
        {
            // 垂直スクロールバーの位置を真ん中に設定
            this.scrollViewer.ScrollToVerticalOffset(this.scrollViewer.ScrollableHeight / 2);
        }
    }
}
ScrollToVerticalOffsetメソッドで縦方向のスクロールバーの位置を設定しています。スクロールバーの位置あScrollableHeigtプロパティでスクロール可能な高さを取得して2で割ることで、真ん中の位置を算出しています。実行してボタンを押した状態の画面を以下に示します。スクロールバーが中央にきていることが確認できます。
