凄くピンポイントなタイトルですが、メインウィンドウ上に配置したThumbをドラッグアンドドロップすると、その場所に丸いウィンドウを出すと言うものです。
Thumbを使ったドラッグアンドドロップと、コントロールの座標からウィンドウ上の座標を取得する方法と、非矩形のウィンドウを作る方法が、ここでゲットできます。
ただ、まだ若干残念なのがドラッグ中に半透明のかっこいい表示は、作りこんでないです。
では、早速ドロップしたときに表示させる丸いウィンドウから作っていきます。元からあるWindow1は放置して、Window2を作成します。丸いウィンドウにしたいので、タイトルバーとか消したり、透明にするために以下のWindowのプロパティを設定しています。
Background="Transparent"
AllowsTransparency="True"
WindowStyle="None"
ShowInTaskbar="False"
そして、ドラッグで移動するようにしたいと思ってるのでThumbのTemplateにEllipseを置いています。そして、ThumbのDragDeltaイベントでウィンドウを移動させる処理を書いています。ということで、XAMLとコードビハインドは以下のようになります。
<Window x:Class="WpfApplication29.Window2"
    xmlns="http://schemas.microsoft.com/winfx/2006/xaml/presentation"
    xmlns:x="http://schemas.microsoft.com/winfx/2006/xaml"
    Background="Transparent"
    AllowsTransparency="True"
    WindowStyle="None"
    SizeToContent="WidthAndHeight"
    ShowInTaskbar="False">
    <Window.ContextMenu>
        <ContextMenu>
            <MenuItem Header="閉じる" Click="MenuItem_Click" />
        </ContextMenu>
    </Window.ContextMenu>
    <Thumb DragDelta="Thumb_DragDelta">
        <Thumb.Template>
            <ControlTemplate>
                <Ellipse Width="300" Height="200" Fill="Red" />
            </ControlTemplate>
        </Thumb.Template>
    </Thumb>
</Window>
using System.Windows;

namespace WpfApplication29
{
    /// <summary>
    /// Window2.xaml の相互作用ロジック
    /// </summary>
    public partial class Window2 : Window
    {
        public Window2()
        {
            InitializeComponent();
        }

        private void MenuItem_Click(object sender, RoutedEventArgs e)
        {
            // コンテキストメニューから閉じるための処理
            this.Close();
        }

        private void Thumb_DragDelta(object sender, System.Windows.Controls.Primitives.DragDeltaEventArgs e)
        {
            // 移動処理
            this.Top += e.VerticalChange;
            this.Left += e.HorizontalChange;
        }
    }
}
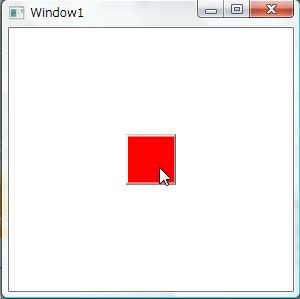
次に、メインのウィンドウを作っていきます。とりあえず、見た目は真ん中に赤色の四角いThumbがあるような感じにしました。
<Window x:Class="WpfApplication29.Window1"
    xmlns="http://schemas.microsoft.com/winfx/2006/xaml/presentation"
    xmlns:x="http://schemas.microsoft.com/winfx/2006/xaml"
    Title="Window1" Height="300" Width="300">
    <Grid>
        <Thumb Width="50" Height="50" Background="Red" DragStarted="Thumb_DragStarted" DragCompleted="Thumb_DragCompleted" DragDelta="Thumb_DragDelta"/>
    </Grid>
</Window>
そして、ドラッグの開始、途中経過、完了のイベントの処理を書いていきます。
using System;
using System.Collections.Generic;
using System.Linq;
using System.Text;
using System.Windows;
using System.Windows.Controls;
using System.Windows.Data;
using System.Windows.Documents;
using System.Windows.Input;
using System.Windows.Media;
using System.Windows.Media.Imaging;
using System.Windows.Navigation;
using System.Windows.Shapes;
using System.Diagnostics;
using System.Windows.Controls.Primitives;

namespace WpfApplication29
{
    /// <summary>
    /// Window1.xaml の相互作用ロジック
    /// </summary>
    public partial class Window1 : Window
    {
        public Window1()
        {
            InitializeComponent();
        }

        private Point _startPoint;
        private Point _currentPoint;
        private void Thumb_DragStarted(object sender, System.Windows.Controls.Primitives.DragStartedEventArgs e)
        {
            var thumb = (Thumb)sender;
            // ドラッグ開始位置の画面上の座標をゲット
            var controlPosition = new Point(
                e.VerticalOffset,
                e.HorizontalOffset);
            _startPoint = thumb.PointToScreen(controlPosition);

            // カーソルを手に変える
            thumb.Cursor = Cursors.Hand;
            Debug.WriteLine("DragStart: " + _currentPoint);
        }

        private void Thumb_DragDelta(object sender, System.Windows.Controls.Primitives.DragDeltaEventArgs e)
        {
            // 途中経過を記録していく
            _currentPoint = new Point(
                _startPoint.X + e.HorizontalChange,
                _startPoint.Y + e.VerticalChange);
            Debug.WriteLine("DragDelta: " + _currentPoint);
            Debug.WriteLine(string.Format("Hor {0}, Ver {1}", e.HorizontalChange, e.VerticalChange));
        }

        private void Thumb_DragCompleted(object sender, System.Windows.Controls.Primitives.DragCompletedEventArgs e)
        {
            Debug.WriteLine("DragCompleted: " + _currentPoint);
            // ドラッグが終わったのでカーソルを元通りに
            var thumb = (Thumb)sender;
            thumb.Cursor = Cursors.Arrow;

            // ドラッグしたカーソル位置を中央にして表示
            var window = new Window2();
            window.Show();
            // 表示後に現在の幅と高さを加味して座標計算することで正確な計算が出来る
            window.Top = _currentPoint.Y - window.ActualHeight / 2;
            window.Left = _currentPoint.X - window.ActualWidth / 2;
        }

    }
}
実行してみると・・・
赤い矩形のあるウィンドウがでてきます。

赤い矩形をドラッグすると、カーソルの形が変わります。*1

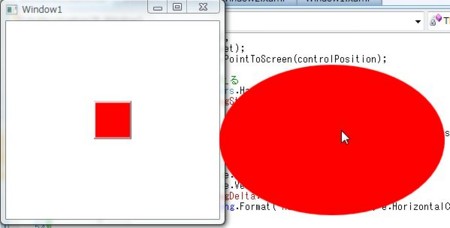
ドロップすると、その場所に赤い楕円が表示されます。

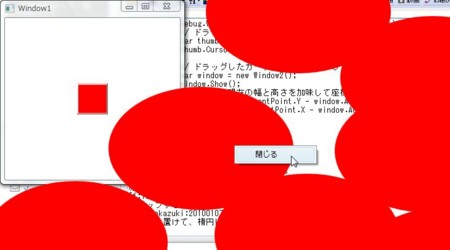
何個でも置けて、楕円は右クリックから閉じることが出来ます。

画像じゃ伝えにくいですが、ちゃんと赤い楕円をドラッグすると移動することもできます。
以上!必要になりそうだったので調べた結果のメモメモ。
*1:キャプチャソフトが対応してないせいか、キャプチャ画面上ではカーソル変わってませんorz