注意:思いついただけです。最適な方法ではないと思います。
今回思いついたことのネタ元
思いついたといっても過去に人がやってるものをちょっといじくった感じです。ネタ元はこれが近いというか、ほぼそのままのイメージです。
- MVVM パターンで VM から VIEW を操作したい
- VからVMにICommandを渡す方法
- MVVM パターンで VM から VIEW を操作したい その2
- VからVMを操作するのにBehaviorを使う
- MVVM パターンで ViewModel から Viewを操作する方法(2)
- 上の実装例(BlendのBehaviorではない)
現状での現実解
以前、VMからVを操作する方法をどうするのかが流行って、最近はPrismのIInteractionRequestとInteractionRequestTriggerあたりのようにVからイベントを発行してTriggerでイベントを購読して、任意のActionを実行するという形に落ち着いてるような気がします。
特に、Prismの実装はIInteractionRequestが提供しているのはイベントだけなので、Prismが実装しているInteractionRequest
あとは、MVVM Light ToolkitのMessengerあたりとかもVMからVへの通知という用途で使われています。MVVM Lightのフォーラムかどこかで見た気がするのですが、このMessengerというやつはPrismのEventAggregatorを、もっと簡単に、手軽に使えるようにしたようなものらしいです。因みに、Messengerのデフォルトインスタンスがシングルトンなので、メッセージ投げたと思ったら、予想以上に反響があるということもあるので、注意して実装する必要があるような気がします。
これまでの実装で気になってるところ
とりあえず、上記の現実解でで気になってるところを思いつくままにあげてみます。
- Prism
- TriggerActionを実装する人は引数がobject型なのでキャストしないといけない
- 個人的に、プログラム書く時は、こういう基盤的なプログラムを書くことが多いので、こういう所めんどくさいと感じてしまいます。
- Vに送信するメッセージとVM側で結果として受信するものが同じ型
- ごちゃごちゃになってて嫌です。引数と戻り値は別々の方がシンプルな気がします。
- Vへの要求に対する応答処理はコールバックになってしまう
- コードが冗長になりがち。
- TriggerActionを実装する人は引数がobject型なのでキャストしないといけない
- MVVM ToolkitのMessenger
- Messengerのデフォルトのインスタンスがシングルトンなのでメッセージが予想外の所まで飛んでいくことがあるので気を付けないといけない。
今回思いついたこと
- VMからVへの通知と結果への応答という用途だけに絞って実装
- VMからVへの通知のためのMessengerは用途単位で準備する
- View側のBehaviorを実装するときにタイプセーフにしたい
- VMで使用するMessengerはV側から指定してやる
- VMでは送信したメッセージへの応答を同期的に待つか、非同期か選べるようにしたい
- Silverlightでは非同期になってしまうことが多々あるので考慮しておいたほうが移植は楽
- Reactive Extensions使いたいからっていうのもある
- 送信するメッセージの型と戻り値の型は別にしたい
- 引数と戻り値は特定の型に縛られたくない
ということで実装開始
Messengerの作成
まずは、Messengerのインターフェースを決めます。任意の型のメッセージを送信して、任意の型を返すというだけなので簡単です。戻り値は、VM側で同期的に待つのか、非同期で結果が返ってきたら処理するのか任意に選べるようにしたいということなのでIObservableにしました。
namespace TypeSafeMessengerTest.Messaging
{
    using System;

    public interface IMessenger<TParam, TResult>
    {
        IObservable<TResult> Send(TParam parameter);
    }
}
VからVMへMessengerを提供して、Messageに応答して処理をするBehaviorの基本クラス
こいつが、一番機能盛りだくさんなクラスなのでちょっとずつ実装していきます。まず、任意の型メッセージに応答して任意の型の結果を返すという機能をもつという点とビヘイビアであるということなので、以下のような抽象クラスとして定義します。
namespace TypeSafeMessengerTest.Messaging
{
    using System;
    using System.Collections.Generic;
    using System.Concurrency;
    using System.Linq;
    using System.Threading;
    using System.Windows;
    using System.Windows.Interactivity;

    /// <summary>
    /// メッセージに応答して任意の処理をするビヘイビアの基本クラス
    /// </summary>
    /// <typeparam name="TParam">受信するメッセージの型</typeparam>
    /// <typeparam name="TResult">返す値の型</typeparam>
    public abstract class MessageReceiverBase<TParam, TResult> : Behavior<FrameworkElement>
    {
        // Viewに渡すMessenger用の依存プロパティ
        public static readonly DependencyProperty MessangerProperty =
            DependencyProperty.Register("Messanger", typeof(IMessenger<TParam, TResult>), typeof(MessageReceiverBase<TParam, TResult>), new UIPropertyMetadata(null));

        public IMessenger<TParam, TResult> Messanger
        {
            get { return (IMessenger<TParam, TResult>)GetValue(MessangerProperty); }
            set { SetValue(MessangerProperty, value); }
        }

        /// <summary>
        /// このメソッドをオーバーライドして実行する処理をカスタマイズする
        /// </summary>
        /// <param name="parameter"></param>
        /// <returns></returns>
        protected abstract TResult Execute(TParam parameter);

}
次に、このビヘイビアの内部クラスとして、以下のようなIMessengerの実装を定義する。内部クラスにするのはビヘイビアの型パラメータを引き継ぎたいためです。
/// <summary>
/// このビヘイビア内部で使用するIMessengerの実装。
/// ビヘイビアの型パラメータをそのまま継承する。
/// </summary>
class InternalMessenger : IMessenger<TParam, TResult>
{
    // このMessengerを作ったBehavior
    private MessageReceiverBase<TParam, TResult> parent;

    public InternalMessenger(MessageReceiverBase<TParam, TResult> parent)
    {
        this.parent = parent;
    }

    public IObservable<TResult> Send(TParam parameter)
    {
        // 応答を非同期で返せるようにAsyncSubjectを使う
        var subject = new AsyncSubject<TResult>(Scheduler.CurrentThread);
        if (this.parent.Dispatcher.Thread == Thread.CurrentThread)
        {
            // UIスレッドなのでBehaviorのExecuteの結果を通知して完了
            subject.OnNext(this.parent.Execute(parameter));
            subject.OnCompleted();
        }
        else
        {
            // UIスレッドではないのでUIスレッド上でExecuteを呼び出して結果を通知
            this.parent.Dispatcher.BeginInvoke(new Action(
                () =>
                {
                    subject.OnNext(this.parent.Execute(parameter));
                    subject.OnCompleted();
                }));
        }
        // SubjectをIObservableにして返す
        return subject.AsObservable();
    }
}
最後に、BehaviorのOnAttachedとOnDetachingでMessengerの設定と後始末をします。
protected override void OnAttached()
{
    base.OnAttached();
    this.Messanger = new InternalMessenger(this);
}

/// <summary>
/// 一応Messengerを掃除
/// </summary>
protected override void OnDetaching()
{
    this.Messanger = null;
    base.OnDetaching();
}
ということで全体は以下のようになりました。
namespace TypeSafeMessengerTest.Messaging
{
    using System;
    using System.Collections.Generic;
    using System.Concurrency;
    using System.Linq;
    using System.Threading;
    using System.Windows;
    using System.Windows.Interactivity;

    /// <summary>
    /// メッセージに応答して任意の処理をするビヘイビアの基本クラス
    /// </summary>
    /// <typeparam name="TParam">受信するメッセージの型</typeparam>
    /// <typeparam name="TResult">返す値の型</typeparam>
    public abstract class MessageReceiverBase<TParam, TResult> : Behavior<FrameworkElement>
    {
        // Viewに渡すMessenger用の依存プロパティ
        public static readonly DependencyProperty MessangerProperty =
            DependencyProperty.Register("Messanger", typeof(IMessenger<TParam, TResult>), typeof(MessageReceiverBase<TParam, TResult>), new UIPropertyMetadata(null));

        public IMessenger<TParam, TResult> Messanger
        {
            get { return (IMessenger<TParam, TResult>)GetValue(MessangerProperty); }
            set { SetValue(MessangerProperty, value); }
        }

        /// <summary>
        /// アタッチのタイミングでMessengerを初期化
        /// </summary>
        protected override void OnAttached()
        {
            base.OnAttached();
            this.Messanger = new InternalMessenger(this);
        }

        /// <summary>
        /// 一応Messengerを掃除
        /// </summary>
        protected override void OnDetaching()
        {
            this.Messanger = null;
            base.OnDetaching();
        }

        /// <summary>
        /// このメソッドをオーバーライドして実行する処理をカスタマイズする
        /// </summary>
        /// <param name="parameter"></param>
        /// <returns></returns>
        protected abstract TResult Execute(TParam parameter);

        /// <summary>
        /// このビヘイビア内部で使用するIMessengerの実装。
        /// ビヘイビアの型パラメータをそのまま継承する。
        /// </summary>
        class InternalMessenger : IMessenger<TParam, TResult>
        {
            // このMessengerを作ったBehavior
            private MessageReceiverBase<TParam, TResult> parent;

            public InternalMessenger(MessageReceiverBase<TParam, TResult> parent)
            {
                this.parent = parent;
            }

            public IObservable<TResult> Send(TParam parameter)
            {
                // 応答を非同期で返せるようにAsyncSubjectを使う
                var subject = new AsyncSubject<TResult>(Scheduler.CurrentThread);
                if (this.parent.Dispatcher.Thread == Thread.CurrentThread)
                {
                    // UIスレッドなのでBehaviorのExecuteの結果を通知して完了
                    subject.OnNext(this.parent.Execute(parameter));
                    subject.OnCompleted();
                }
                else
                {
                    // UIスレッドではないのでUIスレッド上でExecuteを呼び出して結果を通知
                    this.parent.Dispatcher.BeginInvoke(new Action(
                        () =>
                        {
                            subject.OnNext(this.parent.Execute(parameter));
                            subject.OnCompleted();
                        }));
                }
                // SubjectをIObservableにして返す
                return subject.AsObservable();
            }
        }

    }
}
試しにメッセージボックスを表示するためのビヘイビアを実装してみようお試しにOKとCancelが選べるメッセージボックスを表示して結果としてMessageBoxResultを返すビヘイビアを実装してみます。
実装の仕方は簡単で、さっき作ったビヘイビアを継承してExecuteを実装するだけです。
namespace TypeSafeMessengerTest.Messaging
{
    using System.Windows;

    /// <summary>
    /// stringを受けてMessageBoxResultを返す
    /// </summary>
    public class MessageBoxMessageReceiver : MessageReceiverBase<string, MessageBoxResult>
    {
        // MessageBoxのタイトル
        public string MessageBoxTitle
        {
            get { return (string)GetValue(MessageBoxTitleProperty); }
            set { SetValue(MessageBoxTitleProperty, value); }
        }

        public static readonly DependencyProperty MessageBoxTitleProperty =
            DependencyProperty.Register("MessageBoxTitle", typeof(string), typeof(MessageBoxMessageReceiver), new UIPropertyMetadata("確認"));

        // メッセージボックスを表示して結果を返す
        protected override MessageBoxResult Execute(string parameter)
        {
            return MessageBox.Show(parameter, this.MessageBoxTitle, MessageBoxButton.OKCancel);
        }
    }
}
ビヘイビアを実装する側はとてもシンプルになりました。
使ってみよう
Prismのクラスを使って簡単なアプリで動作を見てみようと思います。その前にIObservableに以下のような拡張メソッドを用意しました。確実にUIスレッド上でDispatchできるようにするための部品です。
なんとなく動きを見た感じだと、ObserveOnDispatcherは、呼び出し元のDispatcherで処理をするような動きをしてるので確実にUIスレッドで動作させるという用途には、ちょっと弱い気がしたからです。(間違ってたら指摘してください)
namespace TypeSafeMessengerTest
{
    using System;
    using System.Concurrency;
    using System.Linq;
    using System.Windows.Threading;

    public static class UIObservableExtensions
    {
        private static DispatcherScheduler scheduler;

        // どこかでこのメソッドを使って初期化する
        public static void Initialize(Dispatcher dispatcher)
        {
            scheduler = new DispatcherScheduler(dispatcher);
        }

        public static IObservable<T> ObserveOnUIDispatcher<T>(this IObservable<T> self)
        {
            return self.ObserveOn(scheduler);
        }
    }
}
上記のクラスの初期化を行うためにApp.xamlのStartupイベントを以下のようにしました。
namespace TypeSafeMessengerTest
{
    using System.Windows;

    /// <summary>
    /// App.xaml の相互作用ロジック
    /// </summary>
    public partial class App : Application
    {
        private void Application_Startup(object sender, StartupEventArgs e)
        {
            // UIスレッドで初期化&メインウィンドウを表示
            UIObservableExtensions.Initialize(this.Dispatcher);
            new MainWindow().Show();
        }
    }
}
それに応じてApp.xamlは以下のようになります。Startupイベントを追加してるだけですね。
<Application x:Class="TypeSafeMessengerTest.App"
             xmlns="http://schemas.microsoft.com/winfx/2006/xaml/presentation"
             xmlns:x="http://schemas.microsoft.com/winfx/2006/xaml"
             Startup="Application_Startup">
    <Application.Resources>

    </Application.Resources>
</Application>
次にViewModelを作ります。コマンドが2種類あって、1つはUIスレッド上から呼び出す前提のものと、もう1つはMessengerをUIスレッドとは別のスレッドから使うようにしたものです。
namespace TypeSafeMessengerTest.ViewModels
{
    using System;
    using System.Collections.ObjectModel;
    using System.Linq;
    using System.Threading;
    using System.Windows;
    using Microsoft.Practices.Prism.Commands;
    using Microsoft.Practices.Prism.ViewModel;
    using TypeSafeMessengerTest.Messaging;

    public class MainWindowViewModel : NotificationObject
    {
        // OKとCancelが押されたことに対する履歴
        private ObservableCollection<string> log = new ObservableCollection<string>();

        private DelegateCommand<string> alertCommand;

        private DelegateCommand<string> alertBackgroundCommand;

        // VからバインドしてもらうためのMessenger
        public IMessenger<string, MessageBoxResult> MessageBoxMessenger { get; set; }

        public DelegateCommand<string> AlertCommand
        {
            get
            {
                return this.alertCommand = this.alertCommand ??
                    new DelegateCommand<string>(this.AlertExecute);
            }
        }

        public DelegateCommand<string> AlertBackgroundCommand
        {
            get
            {
                return this.alertBackgroundCommand = this.alertBackgroundCommand ??
                    new DelegateCommand<string>(this.AlertBackgroundExecute);
            }
        }

        public ObservableCollection<string> Log
        {
            get { return this.log; }
        }

        private void AlertExecute(string messageBoxMessage)
        {
            // UIスレッド上から実行される前提
            var ret = this.MessageBoxMessenger.Send(messageBoxMessage);
            // 結果を待ってログに追加
            this.Log.Add(ret.First() == MessageBoxResult.OK ?
                "OKが押されました" : "Cancelが押されました");
        }

        private void AlertBackgroundExecute(string messageBoxMessage)
        {
            // 不自然な実装だけどUIスレッド以外からメッセージを送信した場合
            var th = new Thread(() =>
                {
                    this.MessageBoxMessenger
                        // 送信して
                        .Send(messageBoxMessage)
                        // 結果をUIスレッドで受け取るようにして
                        .ObserveOnUIDispatcher()
                        // 購読
                        .Subscribe(r =>
                        {
                            // 結果をログに追加(UIスレッド以外からObservableCollectionを操作すると例外が飛ぶ)
                            this.Log.Add(r == MessageBoxResult.OK ?
                                "OKが押されました" : "Cancelが押されました");
                        });

                });
            th.Start();
        }
    }
}
画面は、以下のような感じにしました。Commandに対応するボタンが2つと、Logを表示するためのItemsControlです。
<Window x:Class="TypeSafeMessengerTest.MainWindow"
        xmlns="http://schemas.microsoft.com/winfx/2006/xaml/presentation"
        xmlns:x="http://schemas.microsoft.com/winfx/2006/xaml"
        xmlns:vm="clr-namespace:TypeSafeMessengerTest.ViewModels"
        Title="MainWindow" Height="350" Width="525" xmlns:i="http://schemas.microsoft.com/expression/2010/interactivity" xmlns:my="clr-namespace:TypeSafeMessengerTest.Messaging">
    <Window.DataContext>
        <!-- ViewModelの設定 -->
        <vm:MainWindowViewModel />
    </Window.DataContext>
    <Grid>
        <i:Interaction.Behaviors>
            <!-- メッセージボックス表示用のビヘイビア。VMへMessengerをセットしている -->
            <my:MessageBoxMessageReceiver Messanger="{Binding Path=MessageBoxMessenger, Mode=OneWayToSource}" />
        </i:Interaction.Behaviors>
        <Button Content="同期" Height="23" HorizontalAlignment="Left" Margin="12,12,0,0" Name="button1" VerticalAlignment="Top" Width="75" Command="{Binding Path=AlertCommand}" CommandParameter="同期" />
        <Button Content="非同期" Height="23" HorizontalAlignment="Left" Margin="12,41,0,0" Name="button2" VerticalAlignment="Top" Width="75" Command="{Binding Path=AlertBackgroundCommand}" CommandParameter="非同期" />
        <!-- OKとCancelを押したログを表示 -->
        <ItemsControl Margin="12,70,12,12" Name="listBoxLog" ItemStringFormat="{Binding}" ItemsSource="{Binding Path=Log}" />
    </Grid>
</Window>
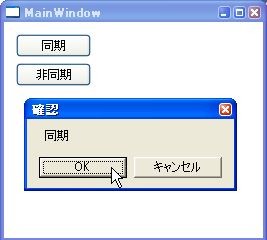
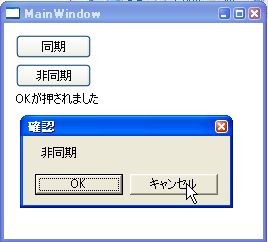
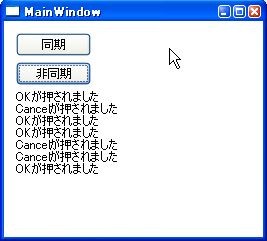
実行してみると、以下のようになります。
ちゃんと動いてるっぽいです。
最後に
この実装の問題点として認識してる部分を書いておきます。
- BindingにOneWayToSourceをつけないと悲惨なことになる
- これは絶対間違えると思う・・・
- BehaviorのMessengerプロパティに勝手に外部から値を入れられることができる
- そういうことをされる前提で作ってないのにできてしまうのが問題
- Prismの実装みたいにTriggerとActionと発行元が綺麗にわかれてないので、潰しは効かないような気がする。
- 1つのBehaviorがMessengerを渡せるのは1つのVMに限定される
- 1つのVMの中にツリー構造上にVMがあることは結構あるけど、それに対応するのに頭を使わないといけない
ということで、思いついたのでメモしておきます。以上。


