過去記事
- WPF4.5入門 その1 「はじめに」
- WPF4.5入門 その2 「WPFとは」
- WPF4.5入門 その3 「Hello world」
- WPF4.5入門 その4 「Mainメソッドはどこにいった?」
- WPF4.5入門 その5 「全てC#でHello world」
- WPF4.5入門 その6 「WPFを構成するものを考えてみる」
- WPF4.5入門 その7 「XAMLのオブジェクト要素と名前空間」
- WPF4.5入門 その8 「オブジェクト要素のプロパティ」
- WPF4.5入門 その9 「コレクション構文」
- WPF4.5入門 その10 「コンテンツ構文」
- WPF4.5入門 その11 「マークアップ拡張」
- WPF4.5入門 その12 「その他のXAMLの機能」
- WPF4.5入門 その13 「簡単なレイアウトを行うコントロール」
- WPF4.5入門 その14 「レイアウトコントロールのCanvasとStackPanel」
DockPanelコントロール
DockPanelコントロールは、コントロールを上下左右と残りの部分にわけて配置するコントロールです。一見Explorer風の左にツリー、右に詳細、上にメニューとツールバー、下にステータスバーといったユーザーインターフェースが簡単に作れそうですが、マウスで領域のサイズ変更などをしようとすると、とたんに難易度が跳ね上がるためスタティックなレイアウトを作るときに利用するくらいが無難だと思われます。
DockPanelは以下のようなプロパティで子要素のレイアウトを制御します。
| プロパティ | 説明 |
|---|---|
| Dock添付プロパティ | System.Windows.Controls.Dock列挙体で規定値はLeftです。列挙体に定義されてる値は左に配置するLeft、上に配置するTop、右に配置するRight、下に配置するBottomになります。 |
| bool LastChildFill { get; set; } | 最後に追加した子を残りの余白全体に敷き詰めるか指定します。規定値はtrueです。 |
DockPanelを使ってエクスプローラーライクな画面レイアウトを作るXAMLの例を以下に示します。
<Window x:Class="DockPanelSample.MainWindow"
        xmlns="http://schemas.microsoft.com/winfx/2006/xaml/presentation"
        xmlns:x="http://schemas.microsoft.com/winfx/2006/xaml"
        Title="MainWindow" Height="350" Width="525">
    <DockPanel>
        <!-- メニューやツールバー -->
        <Button DockPanel.Dock="Top" Content="Menu" />
        <Button DockPanel.Dock="Top" Content="Toolbar" />
        <!-- ステータスバー -->
        <Button DockPanel.Dock="Bottom" Content="StatusBar" />
        <!-- ツリーが表示される場所 最低限の幅確保のためMinWidthプロパティを指定 -->
        <Button DockPanel.Dock="Left" Content="Tree" MinWidth="150" />
        <!-- エクスプローラーの右側の領域 -->
        <Button Content="Content" />
    </DockPanel>
</Window>
上側、下側、左側、残り全体の順番で要素を配置しています。この順番には意味があって左側に置くものを上側や下側よりも先に置くと、メニューやツールバーにあたる要素よりも先に配置されるため以下のような見た目になってしまいます。

WrapPanelコントロール
WrapPanelコントロールは、StackPanelコントロールと同じように横や縦に要素を並べて表示するコントロールです。StackPanelコントロールとの違いは、子要素が外にはみ出したときの挙動でStackPanelが潔く表示しなかったのに対してWrapPanelは、折り返して表示を行います。
WrapPanelで使用する主なプロパティを以下に示します。
| プロパティ | 説明 |
|---|---|
| Orientation Orientation { get; set; } | StackPanelと同様に横並びに配置する場合はHorizontalを設定し、縦並びに配置する場合はVerticalを設定します。 |
| double ItemHeight { get; set; } | WrapPanel内の要素の高さを設定します。NaNの場合は、子要素の高さを優先します。 |
| double ItemWidth { get; set; } | WrapPanel内の要素の幅を設定します。NaNの場合は、子要素の幅を優先します。 |
WrapPanelに幅75pxのボタンを並べるXAMLを以下に示します。
<Window x:Class="WrapPanelSample01.MainWindow"
        xmlns="http://schemas.microsoft.com/winfx/2006/xaml/presentation"
        xmlns:x="http://schemas.microsoft.com/winfx/2006/xaml"
        Title="MainWindow" Height="350" Width="525">
    <WrapPanel>
        <Button Content="Button" Width="75" />
        <Button Content="Button" Width="75" />
        <Button Content="Button" Width="75" />
        <Button Content="Button" Width="75" />
        <Button Content="Button" Width="75" />
        <Button Content="Button" Width="75" />
        <Button Content="Button" Width="75" />
        <Button Content="Button" Width="75" />
        <Button Content="Button" Width="75" />
    </WrapPanel>
</Window>
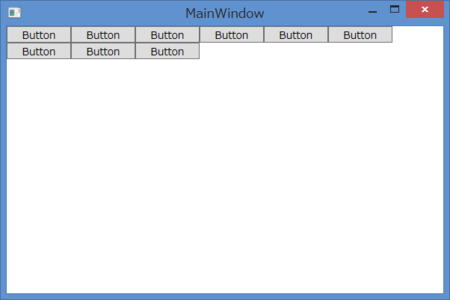
実行すると、以下のようになります。StackPanelと異なり、画面右端でボタンが折り返され2行に渡ってボタンが配置されます。

Windowのサイズを変えると、そのときのサイズに最適な形に要素を再配置します。

次に、OrientationをVerticalにしてItemHeightとItemWidthを指定した場合のXAMLを以下に示します。
<Window x:Class="WrapPanelSample02.MainWindow"
        xmlns="http://schemas.microsoft.com/winfx/2006/xaml/presentation"
        xmlns:x="http://schemas.microsoft.com/winfx/2006/xaml"
        Title="MainWindow" Height="350" Width="525">
    <WrapPanel Orientation="Vertical" ItemHeight="75" ItemWidth="50">
        <Button Content="Button" Width="75" />
        <Button Content="Button" Width="75" />
        <Button Content="Button" Width="75" />
        <Button Content="Button" Width="75" />
        <Button Content="Button" Width="75" />
        <Button Content="Button" Width="75" />
        <Button Content="Button" Width="75" />
        <Button Content="Button" Width="75" />
        <Button Content="Button" Width="75" />
    </WrapPanel>
</Window>
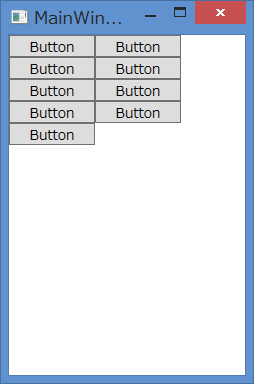
高さを特に指定していないボタンにItemHeightを指定している点と、Witdhを75に指定しているボタンがある状態でItemWidthを50にしている点がポイントです。実行すると、以下のようになります。

ボタンの高さがItemHeightで指定した高さになっていることと、ボタンの幅がItemWidthで指定した幅で描画が切られていることが確認できます。
