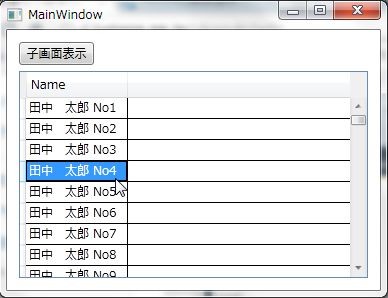
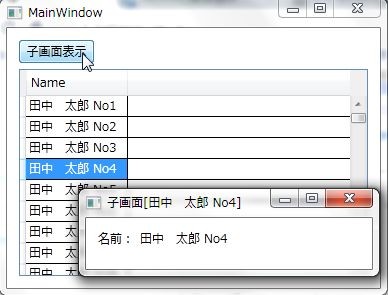
MSDN フォーラムでMVVMの画面遷移についてという質問が上がってたので、Prismを使ってやってみました。
この例で使ってるInteractionRequestの使い方は、以下の記事を参照してください。
ViewModelの作成
今回は、ViewModelからViewへのプロパティの変更通知は必要ない小さなサンプルなので、あえてViewModelはINotifyPropertyChangedを実装していません。単純にめんどくさいからです。
まず、DataGridに表示させる行に対応するViewModelを作成します。
namespace SelectItemWindow
{
    // 画面遷移が主題なのでModelは省いてます
    public class PersonViewModel
    {
        public string Name { get; set; }
    }
}
そして、MainWindowに対応するViewModelを作ります。こいつが一番複雑ですね。
using System;
using System.Collections.Generic;
using System.Linq;
using System.Text;
using System.Windows.Data;
using System.ComponentModel;
using System.Collections.ObjectModel;
using Microsoft.Practices.Prism.Commands;
using Microsoft.Practices.Prism.Interactivity.InteractionRequest;

namespace SelectItemWindow
{
    public class MainWindowViewModel
    {
        // 今回はVMからVへはICollectionViewとして公開しようと思うのでCollectionViewSourceを使う
        private CollectionViewSource peopleSource = new CollectionViewSource();

        // DataGridに表示させるPersonViewModelのコレクション
        private ObservableCollection<PersonViewModel> people;

        // 子画面を表示させる処理をやるコマンド
        private DelegateCommand showSelectedItemCommand;

        // 子画面を表示するリクエストを投げる人
        private InteractionRequest<Notification> showPersonViewRequest = new InteractionRequest<Notification>();

        public MainWindowViewModel()
        {
            // ダミーデータを作ってCollectionViewSourceに設定する
            this.people = new ObservableCollection<PersonViewModel>(
                Enumerable.Range(1, 100)
                    .Select(i => new PersonViewModel { Name = "田中 太郎 No" + i }));
            this.peopleSource.Source = people;
        }

        // Viewに公開するICollectionView
        public ICollectionView PeopleView
        {
            get
            {
                return this.peopleSource.View;
            }
        }

        // ウィンドウ表示のためのリクエスト
        public InteractionRequest<Notification> ShowPersonViewRequest
        {
            get
            {
                return this.showPersonViewRequest;
            }
        }

        // Viewに操作を公開するためのコマンド
        public DelegateCommand ShowSelectedItemCommand
        {
            get
            {
                return this.showSelectedItemCommand = this.showSelectedItemCommand ??
                    new DelegateCommand(
                        ShowSelectedItem,
                        () => this.PeopleView.CurrentItem is PersonViewModel);
            }
        }

        private void ShowSelectedItem()
        {
            // 現在選択されているオブジェクトを取得
            var selectedItem = this.PeopleView.CurrentItem as PersonViewModel;
            // リクエストを投げる
            this.ShowPersonViewRequest.Raise(
                new Notification
                {
                    Title = "子画面[" + selectedItem.Name + "]",
                    Content = selectedItem
                });
        }

    }
}
TriggerActionの作成
Prismには悲しいかな汎用的なTriggerActionの実装はWPFには入ってないので、自分で作ります。
using System;
using System.Collections.Generic;
using System.Linq;
using System.Text;
using System.Windows.Interactivity;
using System.Windows;
using Microsoft.Practices.Prism.Interactivity.InteractionRequest;

namespace SelectItemWindow
{
    public class ShowWindowAction : TriggerAction<FrameworkElement>
    {
        // 表示するWindowのタイプを指定する
        public Type WindowType
        {
            get { return (Type)GetValue(WindowTypeProperty); }
            set { SetValue(WindowTypeProperty, value); }
        }

        public static readonly DependencyProperty WindowTypeProperty =
            DependencyProperty.Register("WindowType", typeof(Type), typeof(ShowWindowAction), new UIPropertyMetadata(null));

        protected override void Invoke(object parameter)
        {
            var e = parameter as InteractionRequestedEventArgs;
            // Windowを作って表示させる
            CreateWindow(e.Context).Show();
        }

        private Window CreateWindow(Notification n)
        {
            if (this.WindowType == null)
            {
                // WindowTypeが設定されてなかったら普通にWindowを作成
                return new Window { Title = n.Title, DataContext = n.Content };
            }
            // WindowTypeが設定されてたら、そのWindowを作成
            var w = this.WindowType.GetConstructor(Type.EmptyTypes).Invoke(null) as Window;
            w.Title = n.Title;
            w.DataContext = n.Content;
            return w;
        }
    }
}
こういうのはプロジェクトでやるときは、共通部品作る人達が、もっと汎用的な形の部品作っておいてくれるようにするのがいいでしょうね。
Viewの作成
あとは、画面をさくさくと作っていくだけです。XAMLをばばっと示します。まずは、MainWindowです。
<Window x:Class="SelectItemWindow.MainWindow"
        xmlns="http://schemas.microsoft.com/winfx/2006/xaml/presentation"
        xmlns:x="http://schemas.microsoft.com/winfx/2006/xaml"
        xmlns:l="clr-namespace:SelectItemWindow"
        Title="MainWindow" Height="350" Width="525" xmlns:i="http://schemas.microsoft.com/expression/2010/interactivity" xmlns:my="http://www.codeplex.com/prism">
    <Window.DataContext>
        <l:MainWindowViewModel />
    </Window.DataContext>
    <Grid>
        <i:Interaction.Triggers>
            <!-- ViewModelから飛んできたリクエストを受け取ってWindowと表示させる -->
            <my:InteractionRequestTrigger SourceObject="{Binding Path=ShowPersonViewRequest}">
                <l:ShowWindowAction WindowType="{x:Type l:PersonView}" />
            </my:InteractionRequestTrigger>
        </i:Interaction.Triggers>
        <Button Content="子画面表示" Height="23" HorizontalAlignment="Left" Margin="12,12,0,0" Name="button1" VerticalAlignment="Top" Width="75" Command="{Binding Path=ShowSelectedItemCommand}" />
        <DataGrid Margin="12,41,12,12" Name="dataGrid1" ItemsSource="{Binding Path=PeopleView}" />
    </Grid>
</Window>
次に、子画面のPersonView.xamlです。
<Window x:Class="SelectItemWindow.PersonView"
        xmlns="http://schemas.microsoft.com/winfx/2006/xaml/presentation"
        xmlns:x="http://schemas.microsoft.com/winfx/2006/xaml"
        xmlns:mc="http://schemas.openxmlformats.org/markup-compatibility/2006"
        xmlns:d="http://schemas.microsoft.com/expression/blend/2008"
        xmlns:l="clr-namespace:SelectItemWindow"
        mc:Ignorable="d"
        Title="PersonView" Height="300" Width="300">
    <!-- DataContextは実行時にコードから設定されるのでデザイン時の
         DataContextを設定しておく。-->
    <d:DesignProperties.DataContext>
        <l:PersonViewModel />
    </d:DesignProperties.DataContext>
    <Grid>
        <TextBlock HorizontalAlignment="Left" Margin="12,12,0,0" Name="textBlock1" Text="名前:" VerticalAlignment="Top" />
        <TextBlock HorizontalAlignment="Left" Margin="54,12,0,0" Name="textBlock2" Text="{Binding Path=Name}" VerticalAlignment="Top" />
    </Grid>
</Window>

