かずきのBlog@hatena

すきな言語は C# + XAML の組み合わせ。Azure Functions も好き。最近は Go 言語勉強中。日本マイクロソフトで働いていますが、ここに書いていることは個人的なメモなので会社の公式見解ではありません。

Windows ストアアプリでマークアップ拡張作りたい・・・!(作れません)

オワタ。

というのでは何なので、1つだけ残された拡張の道を歩んでみようと思います。最近まで存在を知らなかったCustomResourceというマークアップ拡張があります。こいつは、デフォルトでは動作しないかわりに、自分で独自の実装を差し込むことが出来るようになっています。やり方は以下の通り。

  • CustomXamlResourceLoaderクラスを継承したクラスを作る
  • GetResourceメソッドをオーバーライドして、状況に応じて返したい型を返すロジックを書く
  • App.xaml.csのコンストラクタで以下の処理をする
    • CustomXamlResourceLoader.Currentに自前クラスのインスタンスをつっこむ

実用的ではないですが、以下のようなCustomXamlResourceLoaderを継承したクラスを作ったとします。

using System;
using System.Collections.Generic;
using System.Text;
using Windows.UI.Xaml.Resources;

namespace App2
{
    public class MyCustomLoader : CustomXamlResourceLoader
    {
        protected override object GetResource(
            string resourceId, string objectType, string propertyName, string propertyType)
        {
            return string.Join(", ", resourceId, objectType, propertyName, propertyType);
        }
    }
}

そして、Appクラスのコンストラクタで、このMyCustomLoaderを使うように設定します。

public App()
{
    CustomXamlResourceLoader.Current = new MyCustomLoader();

    this.InitializeComponent();
    this.Suspending += this.OnSuspending;
}

あとはCustomResourceマークアップ拡張をかくだけです。適当に画面にTextBlockを置いて、Textプロパティに設定してみました。

<TextBlock Text="{CustomResource SampleCustomResource}" />

そうすると、TextBlockが以下のように表示されます。

f:id:okazuki:20140627081948p:plain

まとめ

ドキュメントにも、普通つかわんだろみたいなことが書いてあったのですが、普通使わない感じですね・・・!誰得情報でした。

WinRTのAPIをデスクトップアプリから使う 8.1版

Windows 8.0のころとそんなに変わりありませんでした。

8.0の頃はプロジェクトファイルに8.0と書いてたけど8.1にします。プロジェクトをアンロードして下記の内容を最初のPropertyGroupタグの中に追記します。

<TargetPlatformVersion>8.1</TargetPlatformVersion>

プロジェクトの再読込をしたら、参照でWindows -> コア -> Windowsを追加します。これがwinmdファイルになります。

次に以下のフォルダにあるSystem.Runtime.WindowsRuntime.dllを参照に追加します。

  • C:\Program Files (x86)\Reference Assemblies\Microsoft\Framework.NETCore\v4.5.1

あとは、Windows Runtimeでデスクトップに対応しているAPIを叩きまくりましょう!

めとべや東京 #4の資料公開。「ユニバーサルWindowsアプリ入門」 #めとべや東京

今回は人数が70人超えててびっくりしました。緊張緊張…。

資料はいつも通りSlideShareにアップロードしました。フォントが崩れるので現物をDLしてみるのが個人的にお勧めです。

Windows store appとWindows Phone appでPrism for WinRTを使う

ユニバーサル Windows アプリを作るときに問題になるのは、両方に対応したライブラリじゃないと使えないという点です。PrismAdapterは、ちょっと無理やりにWindowsストアアプリにしか対応していないPrism for WinRTをPhone対応して両方で使えるようにしたもの+VisualStateAwarePageとMvvmAppBaseの継承を不要にしたライブラリです。

簡単な使い方

ユニバーサルWindowsアプリを新規作成して、PrismAdapterをNuGetから入手します。その時の最新バージョンを一応おすすめします(Preだとしても)。今回は0.1.10-beta2をベースに説明します。PrismAdapterを入れたら、NuGetのpackagesフォルダのPrismAdapterのフォルダの中にコードスニペットが入っているのでインストールしておくと捗ります。

Appクラスの編集

AppクラスのOnLaunchedメソッドをPrismAdapter仕様に変更します。普通のコードよりかなりすっきりしてると思います。

using PrismAdapter;
using System.Threading.Tasks;
using Windows.ApplicationModel.Activation;
using Windows.UI.Xaml;

namespace App3
{
    public sealed partial class App : Application
    {
        public App()
        {
            this.InitializeComponent();
        }
        protected override void OnLaunched(LaunchActivatedEventArgs e)
        {
            PrismAdapterBootstrapper.Initialize(b =>
            {
                b.Run(n => n.Navigate("Main", e.Arguments));
                return Task.FromResult(0);
            }, e);
        }
    }
}

ページクラスの作成

ページクラスは、以下のように定型句を入れます。空のページを新規作成してページの属性にPrismを使うこととと、ViewModelを自動で適用する属性をつけます。名前はPrismのデフォルトの規約に従うとViews名前空間に****Pageという形で作成します。MainPage.xamlに属性を追加したコードは以下のようになります。

<Page
    x:Class="App3.Views.MainPage"
    xmlns="http://schemas.microsoft.com/winfx/2006/xaml/presentation"
    xmlns:x="http://schemas.microsoft.com/winfx/2006/xaml"
    xmlns:local="using:App3.Views"
    xmlns:d="http://schemas.microsoft.com/expression/blend/2008"
    xmlns:mc="http://schemas.openxmlformats.org/markup-compatibility/2006"
    xmlns:prism="using:Microsoft.Practices.Prism.StoreApps"
    prism:ViewModelLocator.AutoWireViewModel="True"
    mc:Ignorable="d">

    <Grid Background="{ThemeResource ApplicationPageBackgroundThemeBrush}">

    </Grid>
</Page>

続けてコードビハインドです。ページを継承しないかわりに、ナビゲーションなどの処理をPrismの仕掛けにのせるために定型句を入れる必要があります。これはpagesetupというコードスニペットで挿入できます。

まず、コードビハインドのページのクラスの中身を空にします。

namespace App3.Views
{
    /// <summary>
    /// それ自体で使用できる空白ページまたはフレーム内に移動できる空白ページ。
    /// </summary>
    public sealed partial class MainPage : Page
    {

    }
}

ページクラスの中にフォーカスをもっていってpagesetup tab tabでコードが展開されます。コンストラクタ名だけ正しいものに編集して、PrismNavigationHelperクラスのためのusing PrismAdapterを追加します。

using PrismAdapter;
using Windows.UI.Xaml.Controls;
using Windows.UI.Xaml.Navigation;

// 空白ページのアイテム テンプレートについては、http://go.microsoft.com/fwlink/?LinkId=234238 を参照してください

namespace App3.Views
{
    /// <summary>
    /// それ自体で使用できる空白ページまたはフレーム内に移動できる空白ページ。
    /// </summary>
    public sealed partial class MainPage : Page
    {
        public PrismNavigationHelper NavigationHelper { get; set; }

        public MainPage()
        {
            this.InitializeComponent();
            this.NavigationHelper = new PrismNavigationHelper(this);
            this.NavigationHelper.SaveState += this.NavigationHelper_SaveState;
            this.NavigationHelper.LoadState += this.NavigationHelper_LoadState;
            this.NavigationHelper.EnablePlatformSupport();
        }

        private void NavigationHelper_LoadState(object sender, LoadStateEventArgs e)
        {
        }

        private void NavigationHelper_SaveState(object sender, SaveStateEventArgs e)
        {
        }

        protected override void OnNavigatedFrom(NavigationEventArgs e)
        {
            this.NavigationHelper.OnNavigatedFrom(e);
        }

        protected override void OnNavigatedTo(NavigationEventArgs e)
        {
            this.NavigationHelper.OnNavigatedTo(e);
        }

    }
}

ViewModelクラスの作成

ViewModelはPrismのデフォルトの命名規約に従うとViewModelsという名前空間に****ViewModelという名前で作成します。ここからはPrismの世界なのでふつうに使っていってください。

まとめ

Prism for WinRTはやくWindows Phone対応してください。

PrismAdapter 0.1.10-beta2をリリースしました

NuGetから-Preつけてインストールできます。

今回は、起動時に書く処理をすっきりさせました。PrismAdapterBootstrapperのインスタンスはUIスレッド内で1つじゃないといけないのですが、そこらへんを面倒を見るようにしました。OnLaunchedの中は以下のような感じに書けます。

protected override async void OnLaunched(LaunchActivatedEventArgs e)
{
    await PrismAdapterBootstrapper.Initialize(b =>
    {
        var c = new UnityContainer();
        b.Resolve = t => c.Resolve(t);
        b.RegistPrismInstanceTo(c);
        b.Run(n => n.Navigate("Main", e.Arguments));
        return Task.FromResult<object>(null);
    }, e);
}

割とすっきりじゃないでしょうか。Unity使わないならこんだけです。

protected override async void OnLaunched(LaunchActivatedEventArgs e)
{
    await PrismAdapterBootstrapper.Initialize(b =>
    {
        b.Run(n => n.Navigate("Main", e.Arguments));
        return Task.FromResult<object>(null);
    }, e);
}

PrismAdapter 0.1.10-beta1をリリースしました

PhoneでもstoreでもPrism for WinRTを使いたい人のためのライブラリを更新しました。今回の更新は、DIコンテナのUnityがPhoneに対応するバージョンを出してきたので、それに対応しました。

それに伴い、内部でかかえていた電話用のUnityのアセンブリを取り除いてNuGetから取得するようになっています。入手はNuGetからどうぞ。

Windowsストアみたいなメニューの出し方(未完全)

ちょっと未完全ですが、それっぽい感じに近づいてきたのでここらへんで一度放流。

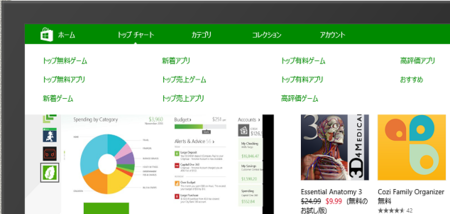
Windows ストアのメニュー

新しいWindowsストアが、アプリバーを無くしてきました…。まるでメニューみたいなものが画面上部についてます。初期のWindowsストアアプリの審査では、絶対に//reject/されてたような感じです。

f:id:okazuki:20140519220717p:plain

出し方

Flyoutで出すのが一番楽です。Flyoutは、FlyoutPresenterStyleを設定することで、Flyoutの見た目をカスタマイズできます。デフォルトでは最大の幅とかが設定されてそうなので、設定を解除するのと、Templateを差し換えて枠とかをとっぱらいます。

<Style x:Key="FlyoutPresenterStyle" TargetType="FlyoutPresenter">
    <Setter Property="MaxWidth" Value="NaN" />
    <Setter Property="MaxHeight" Value="NaN" />
    <Setter Property="Template">
        <Setter.Value>
            <ControlTemplate TargetType="FlyoutPresenter">
                <ContentPresenter />
            </ControlTemplate>
        </Setter.Value>
    </Setter>
</Style>

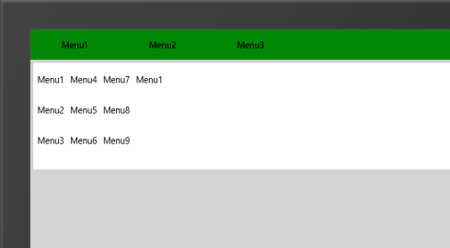
このFlyoutPresenterのStyleを設定したFlyoutを作ります。こいつがメニューっぽい感じになります。ポイントは中身にFlipViewを置くことです。こいつは可能な限りひろがろうとするので、何もしないと横幅いっぱい、縦幅いっぱいになります。今回は、これに高さを制限することで、いい感じの高さで、幅が画面いっぱいになるようにしました。 FlipViewの中には、GridViewを置いてメニューっぽくアイテムを並べています。

<Flyout 
    x:Key="Menu1Flyout" 
    FlyoutPresenterStyle="{StaticResource FlyoutPresenterStyle}" 
    Placement="Bottom">
    <Grid Height="175" Background="White">
        <FlipView>
            <GridView>
                <GridViewItem Content="Menu1" />
                <GridViewItem Content="Menu2" />
                <GridViewItem Content="Menu3" />
                <GridViewItem Content="Menu4" />
                <GridViewItem Content="Menu5" />
                <GridViewItem Content="Menu6" />
                <GridViewItem Content="Menu7" />
                <GridViewItem Content="Menu8" />
                <GridViewItem Content="Menu9" />
                <GridViewItem Content="Menu10" />
            </GridView>
        </FlipView>
    </Grid>
</Flyout>

ボタン

メニューっぽい見た目のボタンはTextBlockButtonStyleに少し手を入れて、Contentを真ん中に配置できるようにしました。

<Style x:Key="StoreMenuLikeButtonStyle" TargetType="Button">
    <Setter Property="Template">
        <Setter.Value>
            <ControlTemplate TargetType="ButtonBase">
                <Border>
                    <VisualStateManager.VisualStateGroups>
                        <VisualStateGroup x:Name="CommonStates">
                            <VisualState x:Name="Normal"/>
                            <VisualState x:Name="PointerOver">
                                <Storyboard>
                                    <ObjectAnimationUsingKeyFrames Storyboard.TargetName="Text" Storyboard.TargetProperty="Foreground">
                                        <DiscreteObjectKeyFrame KeyTime="0" Value="{ThemeResource ApplicationPointerOverForegroundThemeBrush}"/>
                                    </ObjectAnimationUsingKeyFrames>
                                </Storyboard>
                            </VisualState>
                            <VisualState x:Name="Pressed">
                                <Storyboard>
                                    <ObjectAnimationUsingKeyFrames Storyboard.TargetName="Text" Storyboard.TargetProperty="Foreground">
                                        <DiscreteObjectKeyFrame KeyTime="0" Value="{ThemeResource ApplicationPressedForegroundThemeBrush}"/>
                                    </ObjectAnimationUsingKeyFrames>
                                </Storyboard>
                            </VisualState>
                            <VisualState x:Name="Disabled">
                                <Storyboard>
                                    <ObjectAnimationUsingKeyFrames Storyboard.TargetName="Text" Storyboard.TargetProperty="Foreground">
                                        <DiscreteObjectKeyFrame KeyTime="0" Value="{ThemeResource ApplicationPressedForegroundThemeBrush}"/>
                                    </ObjectAnimationUsingKeyFrames>
                                </Storyboard>
                            </VisualState>
                        </VisualStateGroup>
                        <VisualStateGroup x:Name="FocusStates">
                            <VisualState x:Name="Focused">
                                <Storyboard>
                                    <DoubleAnimation Duration="0" To="1" Storyboard.TargetName="FocusVisualWhite" Storyboard.TargetProperty="Opacity"/>
                                    <DoubleAnimation Duration="0" To="1" Storyboard.TargetName="FocusVisualBlack" Storyboard.TargetProperty="Opacity"/>
                                </Storyboard>
                            </VisualState>
                            <VisualState x:Name="Unfocused"/>
                        </VisualStateGroup>
                        <VisualStateGroup x:Name="CheckStates">
                            <VisualState x:Name="Checked"/>
                            <VisualState x:Name="Unchecked">
                                <Storyboard>
                                    <ObjectAnimationUsingKeyFrames Storyboard.TargetName="Text" Storyboard.TargetProperty="Foreground">
                                        <DiscreteObjectKeyFrame KeyTime="0" Value="{ThemeResource ApplicationSecondaryForegroundThemeBrush}"/>
                                    </ObjectAnimationUsingKeyFrames>
                                </Storyboard>
                            </VisualState>
                            <VisualState x:Name="Indeterminate"/>
                        </VisualStateGroup>
                    </VisualStateManager.VisualStateGroups>
                    <Grid Background="Transparent">
                        <ContentPresenter 
                            x:Name="Text" 
                            Content="{TemplateBinding Content}" 
                            HorizontalAlignment="{TemplateBinding HorizontalContentAlignment}"
                            VerticalAlignment="{TemplateBinding VerticalContentAlignment}"/>
                        <Rectangle
                            x:Name="FocusVisualWhite"
                            IsHitTestVisible="False"
                            Stroke="{ThemeResource FocusVisualWhiteStrokeThemeBrush}"
                            StrokeEndLineCap="Square"
                            StrokeDashArray="1,1"
                            Opacity="0"
                            StrokeDashOffset="1.5"/>
                        <Rectangle
                            x:Name="FocusVisualBlack"
                            IsHitTestVisible="False"
                            Stroke="{ThemeResource FocusVisualBlackStrokeThemeBrush}"
                            StrokeEndLineCap="Square"
                            StrokeDashArray="1,1"
                            Opacity="0"
                            StrokeDashOffset="0.5"/>
                    </Grid>
                </Border>
            </ControlTemplate>
        </Setter.Value>
    </Setter>
</Style>

ページ

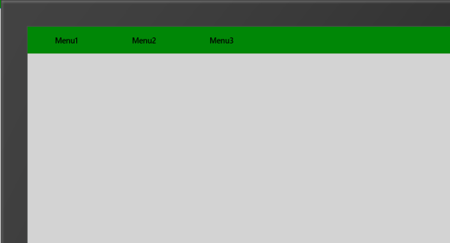
ページの上側にStackPanelで横並びにButtonを置きます。そしてStyleに先ほど作ったStoreMenuLikeButtonStyleを適用して、FlyoutにMenu1Flyoutを適用します。

<StackPanel Orientation="Horizontal" Background="#FF008706">
    <Button 
        Content="Menu1" 
        Style="{StaticResource StoreMenuLikeButtonStyle}" 
        Width="150" 
        VerticalAlignment="Stretch" Flyout="{StaticResource Menu1Flyout}"/>
    <Button 
        Content="Menu2" 
        Style="{StaticResource StoreMenuLikeButtonStyle}" 
        Width="150" 
        VerticalAlignment="Stretch"/>
    <Button 
        Content="Menu3" 
        Style="{StaticResource StoreMenuLikeButtonStyle}" 
        Width="150" 
        VerticalAlignment="Stretch"/>
</StackPanel>

これで実行してMenu1をタップすると、それっぽいメニューが出てきます。

f:id:okazuki:20140519222344p:plain

f:id:okazuki:20140519222603p:plain

未完成部分

ストアは、マウスオーバーしたときと、メニューが開いたときにボタンにしるしがつきます。こいつを楽につける方法が思いつかないのが今の課題です。あとFlyoutでできる微妙な余白も取り除きたい…。

ボタン風カスタムコントロール+Popupでやると本物により近づけそうだけど、ちょっと辛い…。

Universal Windows app入門 表という名前でKindle本出してみました

表題の通りです。

表があるということは裏もある予定です。とりあえず、試し読みで目次は確認できるので興味があるかたは試してみてください。表紙はちょっとぐちゃっとないりますね…orz

東北行く人は東北さくらトリップ入れてもいいかも?あと興味深い実装も?

MVPの初音さんが作った東北さくらトリップというアプリがあります。

このアプリ名前の通り東北の桜の名所+アルファの情報を表示してくれるアプリです。

f:id:okazuki:20140423185508j:plain

このアプリの説明を簡単にすると、桜の見どころからSNSの情報、ほかの近所の観光地や宿泊情報など、東北へ行く際の旅行を完全にサポート!!してくれるアプリです。

f:id:okazuki:20140423185628j:plain

トップ画面で待機してると桜がひらひら舞い落ちてきたり見てるだけでも楽しいアプリになってます。

この実装が気になって担当してたみつばたんにお願いして作成風景とってもらった動画がこちら。

さくらの実装もさることながら、色々なSNSと連携したりと詰まってる技術要素の数には頭が下がります。

というこで、初音さんに確認したところGWくらいが東北は桜が見ごろということなので、Windowsタブレット片手に行く予定の方は、このアプリを入れてみるといいのではないかと思いました。