react-routerで画面遷移のリンクといえばLinkタグかIndexLinkタグを使います。 でも、react-bootstrapのNavを使って画面の上部のタブみたいなのを作ろうとすると、Linkタグは使えません。

そんな時は、プログラムからhistoryを制御してやるといいです。
こんな感じにRouteを定義して
var router = (
    <Router history={history.createHashHistory()}>
        <Route path='/' component={App}>
            <IndexRoute component={IndexPage} />
            <Route path='/page1'>
                <IndexRoute component={Page1} />
                <Route path=':id' component={Page1} />
            </Route>
        </Route>
    </Router>
);

ReactDOM.render(
    router,
    document.getElementById('content'));
Appクラスでは、こんな感じにNavbarを定義しておきます。
class App extends React.Component<React.Props<{}>, {}> {
    render() {
        return (
            <div>
                <Navbar>
                    <Navbar.Header>
                        <Navbar.Brand>
                            <span>Route app!</span>
                        </Navbar.Brand>
                    </Navbar.Header>
                    <Nav>
                        <NavItem href='/'>Index</NavItem>
                        <NavItem href='/page1'>Page1</NavItem>
                    </Nav>
                </Navbar>
                <Grid>
                    <Row>
                        <Col md={12}>
                            {this.props.children}
                        </Col>
                    </Row>
                </Grid>
            </div>
        );
    }
}
IndexPageとPage1は適当に定義しておきます。
// IndexPage
import * as React from 'react';
import {Link} from 'react-router';

export default class IndexPage extends React.Component<{}, {}> {
    render() {
        return (
            <Link to='/page1/10'>/page1/10</Link>
        );
    }
}
// Page1
import * as React from 'react';
import * as ReactRouter from 'react-router';

export default class Page1 extends React.Component<ReactRouter.RouteComponentProps<{}, { id: number }>, {}> {
    render() {
        return (
            <h1>Page1 {this.props.routeParams.id}</h1>
        );
    }
}
実行するとこんな感じになります。

まだリンクをクリックしてもちゃんと動きません。クリックでちゃんと動くようにするにはNavタグのonSelectイベントをハンドリングする必要があります。このonSelectの第2引数にhrefが渡ってくるので、こいつをhistoryにpushしてやります。
class App extends React.Component<RouteComponentProps<{}, {}>, {}> {

    private handleSelect(key: number, href: string) {
        this.props.history.push(href);
    }

    render() {
        return (
            <div>
                <Navbar>
                    <Navbar.Header>
                        <Navbar.Brand>
                            <span>Route app!</span>
                        </Navbar.Brand>
                    </Navbar.Header>
                    <Nav onSelect={this.handleSelect.bind(this)}>
                        <NavItem href='/'>Index</NavItem>
                        <NavItem href='/page1'>Page1</NavItem>
                    </Nav>
                </Navbar>
                <Grid>
                    <Row>
                        <Col md={12}>
                            {this.props.children}
                        </Col>
                    </Row>
                </Grid>
            </div>
        );
    }
}
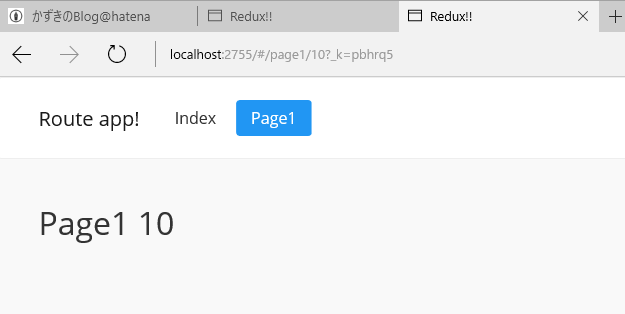
Page1に遷移した様子

次に、カレントのページのタブの色を変えます。これはちょっとめんどくさくて、Stateに現在のカレントのhrefを持たせるプロパティを定義します。
interface AppState {
    activeHref: string;
}

class App extends React.Component<RouteComponentProps<{}, {}>, AppState> {
    // 省略
}
そして、componentDidMountでhistoryのlistenで画面遷移を監視して、そこでisActiveを使って現在のカレントのhrefを探し当てます。どんなページがあるのかということを予め定義しておいて、そこから探すのがお手軽です。ついでに、NavItemも、その情報をベースに組み立てるようにするといい感じになります。
const pageMap = [
    { href: '/', label: 'Index', indexOnly: true },
    { href: '/page1', label: 'Page1', indexOnly: false },
];

interface AppState {
    activeHref: string;
}

class App extends React.Component<RouteComponentProps<{}, {}>, AppState> {

    private hisotryToken: Function;

    constructor(props: RouteComponentProps<{}, {}>) {
        super(props);
        this.state = { activeHref: '/' };
    }

    private handleSelect(key: number, href: string) {
        this.props.history.push(href);
    }

    componentDidMount() {
        this.hisotryToken = this.props.history.listen(() => {
            var activeHref = '';
            pageMap.forEach(map => {
                if (this.props.history.isActive(map.href, null, map.indexOnly)) {
                    activeHref = map.href;
                }
            });
            this.setState({
                activeHref: activeHref
            } as AppState);
        });
    }

    componentWillUnmount() {
        this.hisotryToken();
    }

    render() {
        let navItems = pageMap.map(x => <NavItem href={x.href}>{x.label}</NavItem>);
        return (
            <div>
                <Navbar>
                    <Navbar.Header>
                        <Navbar.Brand>
                            <span>Route app!</span>
                        </Navbar.Brand>
                    </Navbar.Header>
                    <Nav activeHref={this.state.activeHref} onSelect={this.handleSelect.bind(this)}>
                        {navItems}
                    </Nav>
                </Navbar>
                <Grid>
                    <Row>
                        <Col md={12}>
                            {this.props.children}
                        </Col>
                    </Row>
                </Grid>
            </div>
        );
    }
}
これで、タブに色がつくようになります。isActiveのいいところは、/page1でも/page1/10でもいい感じにアクティブかどうか判定してくれる点です。indexOnly引数にtrueを設定すると/みたいなインデックスのURLをいい感じに判定してくれるようになります。

ソースコード
コードの全体はGitHubに上げています。