WCF RIA Servicesを使うとSilverlightでログインの機能を作るのが凄い楽になってます。
楽といっても、MembershipProvider, RoleProvider, ProfileProviderを使うと楽になるって感じです。
Silverlight Business Applicationのプロジェクトを作成すると、ある程度作りこまれた形でプロジェクトが出来上がってしまいますが、ここでは素のSilverlightアプリケーションから作ってみようと思います。
何は無くともプロジェクト作成
普通のSilverlight ApplicationをWCF RIA Servicesを有効にした状態で作ります。
以下の2つの参照をWeb Application側に追加します。
- System.ServiceModel.DomainServices.Hosting
- System.ServiceModel.DomainServices.Server
そしてProvider達
毎度思うけど、*****Providerシリーズって、どうしてこうも変態的なんだろうと思う。
ということで、MembershipProviderとRoleProviderとProfileProviderを必要最低限の実装で作っていきます。
SampleMembershipProvider.cs
何も考えずにApplicationNameと、GetUserと、ValidateUserを実装します。
using System;
using System.Web.Security;

namespace SilverlightApplication6.Web.Providers
{
    public class SampleMembershipProvider : MembershipProvider
    {
        public override string ApplicationName { get; set; }

        public override MembershipUser GetUser(string username, bool userIsOnline)
        {
            // MembershipUserを何も考えずに作成
            return new MembershipUser("SampleMembershipProvider",
                username,
                null,
                null,
                null,
                null,
                false,
                false,
                new DateTime(),
                new DateTime(),
                new DateTime(),
                new DateTime(),
                new DateTime());
        }

        public override bool ValidateUser(string username, string password)
        {
            // とりあえずtest, testでログイン成功
            return username == "test" && password == "test";
        }

        // 以下未実装メソッドがいっぱい続くけど省略

    }
}
SampleRoleProvider.cs
とりあえず、GetRolesForUserだけをさくっと実装します。
using System;
using System.Web.Security;

namespace SilverlightApplication6.Web.Providers
{
    public class SampleRoleProvider : RoleProvider
    {
        public override string ApplicationName { get; set; }

        public override string[] GetRolesForUser(string username)
        {
            // とりあえずユーザ名testだったら適当なロールを割当てる
            if (username == "test")
            {
                return new[] { "testRole1", "testRole2" };
            }
            return null;
        }

        // 以下に未実装のメソッドが続く
    }
}
SampleProfileProvider.cs
こいつが、一番めんどうな気がする上に正しい実装をしているのか自信がもてないけど、とりあえず動いたのでよしとしよう。
まずは、SettingsPropertyValueCollectionというクラスに値を追加するのが凄くめんどくさいので簡略化する拡張メソッドを準備しておきます。
using System;
using System.Configuration;

namespace SilverlightApplication6.Web.Providers
{
    public static class SettingsPropertyValueCollectionExtensions
    {
        // 毎度毎度生のAddメソッドを使うのがめんどいので、拡張メソッドでシンプルにする
        public static SettingsPropertyValueCollection Add(this SettingsPropertyValueCollection self,
            string name,
            object value,
            Type type)
        {
            self.Add(
                new SettingsPropertyValue(
                    new SettingsProperty(
                        name,
                        type,
                        null,
                        true,
                        value,
                        SettingsSerializeAs.String,
                        null,
                        false,
                        false)));
            return self;
        }
    }
}
そして、ProfileProviderを継承したクラスを作ります。
using System;
using System.Collections.Generic;
using System.Linq;
using System.Web;
using System.Web.Profile;
using System.Configuration;

namespace SilverlightApplication6.Web.Providers
{
    public class SampleProfileProvider : ProfileProvider
    {
        public override string ApplicationName { get; set; }

        public override SettingsPropertyValueCollection GetPropertyValues(
            SettingsContext context,
            SettingsPropertyCollection collection)
        {
            // Messageという項目にあいさつ文を仕込んでおく
            var username = context["UserName"];
            var result = new SettingsPropertyValueCollection();
            result.Add("Message", string.Format("こんにちは{0}さん", username), typeof(string));
            return result;
        }

    }
}
Web.configに登録
Provider関連のクラスが出来たのでWeb.configに登録していきます。system.webの下にさくっと追加します。
  <system.web>
    <!-- Form認証 -->
    <authentication mode="Forms" />
    <!-- 各種プロバイダ -->
    <membership defaultProvider="sampleProvider">
      <providers>
        <clear />
        <add name="sampleProvider" type="SilverlightApplication6.Web.Providers.SampleMembershipProvider" />
      </providers>
    </membership>
    <profile enabled="true" defaultProvider="sampleProvider">
      <properties>
        <add name="Message" allowAnonymous="false"/>
      </properties>
      <providers>
        <clear />
        <add name="sampleProvider" type="SilverlightApplication6.Web.Providers.SampleProfileProvider"/>
      </providers>
    </profile>
    <roleManager enabled="true" defaultProvider="sampleProvider">
      <providers>
        <clear/>
        <add name="sampleProvider" type="SilverlightApplication6.Web.Providers.SampleRoleProvider"/>
      </providers>
    </roleManager>
  </system.web>
Userクラスの作成(Webアプリ側)
次にUserクラスを作成します。こいつはUserBaseというクラスが用意されているので継承してさくっと作ります。UserBaseは string NameとIEnumerable
継承して作成したクラスにProfileProviderで追加したプロファイルに対応するプロパティを追加します。今回の場合はMessageプロパティになります。
using System.ServiceModel.DomainServices.Server.ApplicationServices;

namespace SilverlightApplication6.Web
{
    public class User : UserBase
    {
        public string Message { get; set; }
    }
}
ログイン機能を持ったサービスの作成
ここまで苦労してきたら、あとは楽勝です!ログインするサービスを作ってみましょう。AuthenticationBase
using System.ServiceModel.DomainServices.Hosting;
using System.ServiceModel.DomainServices.Server.ApplicationServices;

namespace SilverlightApplication6.Web
{
    [EnableClientAccess]
    public class AuthDomainService : AuthenticationBase<User>
    {
    }
}
ついにSilverlight側
さくっと作っていきます。ユーザ名とパスワードを入力するTextBoxと、Buttonがあるだけのシンプルなクラスを作成します。
<UserControl xmlns:ds="clr-namespace:System.Windows.Controls;assembly=System.Windows.Controls.DomainServices"  x:Class="SilverlightApplication6.MainPage"
    xmlns="http://schemas.microsoft.com/winfx/2006/xaml/presentation"
    xmlns:x="http://schemas.microsoft.com/winfx/2006/xaml"
    xmlns:d="http://schemas.microsoft.com/expression/blend/2008"
    xmlns:mc="http://schemas.openxmlformats.org/markup-compatibility/2006"
    mc:Ignorable="d"
    d:DesignHeight="300" d:DesignWidth="400">

    <Grid x:Name="LayoutRoot" Background="White">
        <TextBox Height="24" HorizontalAlignment="Left" Margin="11,17,0,0" Name="textBox1" VerticalAlignment="Top" Width="120" />
        <TextBox Height="24" HorizontalAlignment="Left" Margin="12,47,0,0" Name="textBox2" VerticalAlignment="Top" Width="120" />
        <Button Content="Button" Height="23" HorizontalAlignment="Left" Margin="57,77,0,0" Name="button1" VerticalAlignment="Top" Width="75" Click="button1_Click" />
    </Grid>
</UserControl>
コードビハインド側にログインのコードを作っていきます。今回はログインに成功したか失敗したかということと、ログインに成功したらユーザ名とロールとメッセージを出すようにします。因みに、Silverlight側のコードをWCF RIA Servicesに生成してもらうために一度ビルドしてからコードを書きます。
using System.Linq;
using System.Windows;
using System.Windows.Controls;
using SilverlightApplication6.Web;

namespace SilverlightApplication6
{
    public partial class MainPage : UserControl
    {
        public MainPage()
        {
            InitializeComponent();
        }

        private void button1_Click(object sender, RoutedEventArgs e)
        {
            // ログインのためのサービス呼び出し
            var auth = new AuthDomainContext();
            // テキストボックスに入れた値をユーザ名、パスワードとして
            auth.Load(auth.LoginQuery(textBox1.Text, textBox2.Text, true, null),
                result =>
                {
                    // 何かエラーが起きたらエラーを表示して終了
                    if (result.HasError)
                    {
                        MessageBox.Show("ログイン失敗 : " + result.Error);
                        return;
                    }
                    // ログインユーザを取得
                    var user = result.Entities.FirstOrDefault();
                    // nullだとログイン失敗、nullじゃない場合は各情報を表示する
                    MessageBox.Show(
                        user == null ? "認証失敗" : user.Name + ": " + user.Message + " : " + string.Join(", ", user.Roles.ToArray()));
                }, null);
        }
    }
}
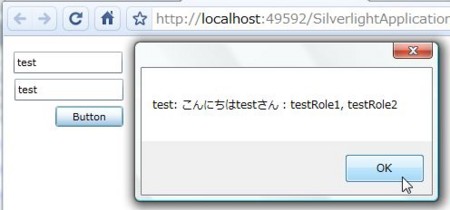
以上で実装は終了です。実行してみます。
test/testと打ち込むとログイン成功するので、とりあえず違うのうってボタンをぽちっとな。

うん。いけてる。ロールも取れてるし、プロファイルも取れてるし、ユーザ名も取れてる!ばっちりだ。

