Expression Blendにある便利機能ビヘイビア(Behavior)(Visual Studioからも使えます)ですが、こいつは自分で色々作ることが出来ます。
ビヘイビアといっても、純粋なビヘイビアと、アクションと呼ばれるトリガーとセットで使うものがあります。
ビヘイビアは、個人的な解釈だとコードビハインドにイベントハンドラを書くことなく何かアクションをさせるための部品と思っています。ビヘイビアとアクションの違いですが、クリックしたときにアラートを出すといったように、イベントが固定されていて、それに対して処理を行うものがビヘイビアで、クリックしたときの部分を○○のイベントがはっせいしたときにアラートを出すといったようにイベントが別にクリックじゃなくても何でもいいといったときにアクションを使います。
ということで、さっそく作り方を見てみます。まずは、簡単なビヘイビアからです。ビヘイビアは、System.Windows.Interactivity.Behavior
というわけで、さっそくボタンをクリックしたら指定されたメッセージを出力するビヘイビアを作ってみようと思います。コードは以下のようになります。
namespace WpfApplication5
{
    using System;
    using System.Windows;
    using System.Windows.Controls;
    using System.Windows.Interactivity;

    // Buttonに対して適用可能な場合は<>にButtonと指定する
    public class AlertBehavior : Behavior<Button>
    {

        #region メッセージプロパティ
        public string Message
        {
            get { return (string)GetValue(MessageProperty); }
            set { SetValue(MessageProperty, value); }
        }

        // Using a DependencyProperty as the backing store for Message.  This enables animation, styling, binding, etc...
        public static readonly DependencyProperty MessageProperty =
            DependencyProperty.Register("Message", typeof(string), typeof(AlertBehavior), new UIPropertyMetadata(null));
        #endregion

        public AlertBehavior()
        {
        }

        // 要素にアタッチされたときの処理。大体イベントハンドラの登録処理をここでやる
        protected override void OnAttached()
        {
            base.OnAttached();
            this.AssociatedObject.Click += Alert;
        }

        // 要素にデタッチされたときの処理。大体イベントハンドラの登録解除をここでやる
        protected override void OnDetaching()
        {
            base.OnDetaching();
            this.AssociatedObject.Click -= Alert;
        }

        // メッセージが入力されていたらメッセージボックスを出す
        private void Alert(object sender, EventArgs e)
        {
            if (string.IsNullOrEmpty(this.Message))
            {
                return;
            }

            MessageBox.Show(this.Message);
        }
    }
}
一般的にビヘイビアを作るとなるとBehaviorクラスのOnAttachedで、イベントハンドラの登録を行い、OnDetachingでイベントハンドラの登録解除を行います。そして、イベントハンドラ内で任意の処理を行います。
ビヘイビアにはプロパティを作ることもできて、ここを依存プロパティで作っておくとバインドとかもできるようになります。
適当なプロジェクトを作ってボタンを画面に置いて今作ったビヘイビアをアセットからドラッグして適用します。オブジェクトとタイムラインウィンドウの表示は以下のようになります。
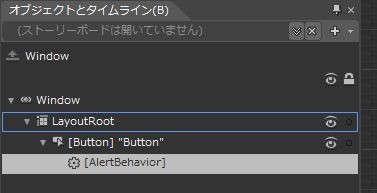
そして、プロパティウィンドウでMessageプロパティに適当なメッセージを設定します。

設定が終わった後のXAMLは以下のようになります。
<Window
	xmlns="http://schemas.microsoft.com/winfx/2006/xaml/presentation"
	xmlns:x="http://schemas.microsoft.com/winfx/2006/xaml"
	xmlns:i="http://schemas.microsoft.com/expression/2010/interactivity" xmlns:local="clr-namespace:WpfApplication5"
	x:Class="WpfApplication5.MainWindow"
	x:Name="Window"
	Title="MainWindow"
	Width="640" Height="480">

	<Grid x:Name="LayoutRoot">
		<Button Content="Button" HorizontalAlignment="Left" Margin="8,8,0,0" VerticalAlignment="Top" Width="75">
			<i:Interaction.Behaviors>
				<local:AlertBehavior Message="こんにちは世界"/>
			</i:Interaction.Behaviors>
		</Button>
	</Grid>
</Window>
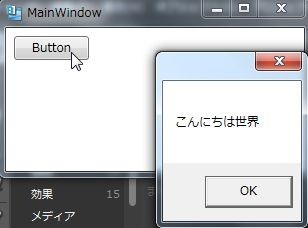
実行してボタンを押すと、コードビハインドにコードを書いてないのに、メッセージボックスが表示されます。
次は、アクションの作り方です。アクションには、ターゲットを指定できるものと、ターゲットが適用された親オブジェクトになる2種類があります。さらに、アクションは、Behavior
namespace WpfApplication5
{
    using System.Windows;
    using System.Windows.Controls;
    using System.Windows.Interactivity;

    //
    // Action のターゲット要素をその親以外にしたい場合、クラスを
    // TriggerAction の代わりに TargetedTriggerAction から拡張します
    //
    public class AlertAction : TriggerAction<Button>
    {
        #region Messageプロパティ
        public string Message
        {
            get { return (string)GetValue(MessageProperty); }
            set { SetValue(MessageProperty, value); }
        }

        public static readonly DependencyProperty MessageProperty =
            DependencyProperty.Register("Message", typeof(string), typeof(AlertAction), new UIPropertyMetadata(null));
        #endregion


        public AlertAction()
        {
        }

        // Actionが実行されたときの処理
        protected override void Invoke(object o)
        {
            if (string.IsNullOrEmpty(this.Message))
            {
                return;
            }

            MessageBox.Show(this.Message);
        }
    }
}
Invokeメソッドでやりたい処理を書くだけでOKなので、Behaviorを継承したときよりもシンプルになっています。アクションのInvokeメソッド内で特定のターゲットなんかに対して処理をしたい場合は、クラスのコメントにあるようにTargetedTriggerActionを継承して、Invokeメソッド内でthis.TargetObjectのようにしてアクセスすることが出来ます。
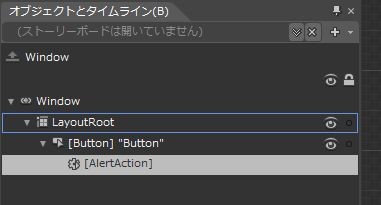
さて、このアクションを使ってみます。画面に適当にボタンを置いて、このアクションをドロップします。オブジェクトとタイムラインウィンドウでは以下のような表示になります。
そして、プロパティウィンドウでアクションを実行するTriggerの設定とプロパティの設定を行います。
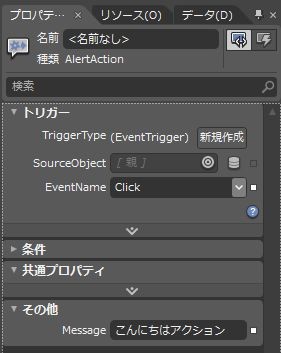
上の図では、ボタンのClickイベントをトリガーにしてアクションを実行するように設定しています。ここで、イベントをクリック以外にすることもできます。
XAMLでは、以下のようになります。
<Window
	xmlns="http://schemas.microsoft.com/winfx/2006/xaml/presentation"
	xmlns:x="http://schemas.microsoft.com/winfx/2006/xaml"
	xmlns:i="http://schemas.microsoft.com/expression/2010/interactivity" xmlns:local="clr-namespace:WpfApplication5"
	x:Class="WpfApplication5.MainWindow"
	x:Name="Window"
	Title="MainWindow"
	Width="640" Height="480">

	<Grid x:Name="LayoutRoot">
		<Button Content="Button" HorizontalAlignment="Left" Margin="8,8,0,0" VerticalAlignment="Top" Width="75">
			<i:Interaction.Triggers>
				<i:EventTrigger EventName="Click">
					<local:AlertAction Message="こんにちはアクション"/>
				</i:EventTrigger>
			</i:Interaction.Triggers>
		</Button>
	</Grid>
</Window>
実行してボタンをクリックすると、メッセージボックスが表示されます。
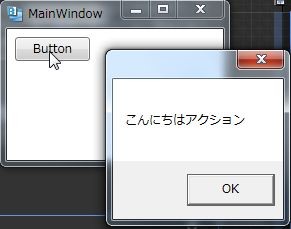
このように、ビヘイビアを簡単に作ってコントロールに適用することが出来ます。こいつは便利です。