最近書いてるReactivePropertyですが、Xamarinにも対応しています。なので、簡単にカウントアップするサンプル(ひな形で生成されるやつ)を作ってみようと思います。
Xamarinのバージョン
使用しているXamarinのバージョンは5.0(build784)です。XamarinのVisual Studioプラグインを利用してVisual Studio上で開発しています。
プロジェクトの作成とReactivePropertyのインストール
新規作成から「Android Ice Cream Sandwich Application」を選びます。プロジェクト名は、CounterAppにしました。
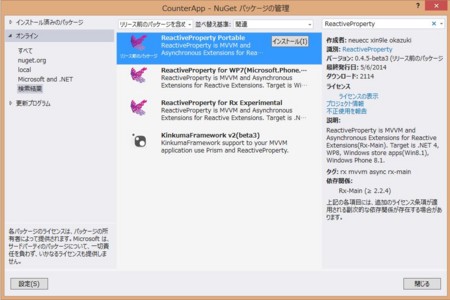
NuGetパッケージの管理からReactivePropertyで検索して「ReactiveProperty Portable」をインストールします。最新のXamarinに現時点で対応しているのは、0.4.5-beta3になるので、リリース前のパッケージを含めるを選択してください。

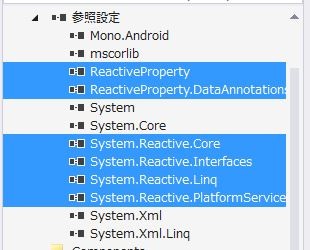
Reactive ExtensionsとReactivePropertyがインストールされます。

カウンタークラスの作成
次にModelとなるCounterクラスを作成します。これはINotifyPropertyChangedを実装した普通のC#のクラスです。現在のカウント値を表すプロパティと、カウントアップするメソッドを持っています。
using System.ComponentModel;
using System.Runtime.CompilerServices;

namespace CounterApp
{
    public class Counter : INotifyPropertyChanged
    {
        public event PropertyChangedEventHandler PropertyChanged;
        private bool SetProperty<T>(ref T field, T value, [CallerMemberName]string propertyName = null)
        {
            if (Equals(field, value))
            {
                return false;
            }

            field = value;
            var h = this.PropertyChanged;
            if (h != null)
            {
                h(this, new PropertyChangedEventArgs(propertyName));
            }

            return true;
        }

        private int count;

        public int Count
        {
            get { return this.count; }
            private set { this.SetProperty(ref this.count, value); }
        }

        public void Incr()
        {
            this.Count++;
        }
    }
}
ViewModelの作成
次に、Activityに紐づけるViewModelクラスを作成します。名前はMainViewModelにしました。先ほど作成したCounterクラスを内部にもってActivityに公開するプロパティや操作などをReactivePropertyやReactiveCommandで定義しています。
using Codeplex.Reactive;
using Codeplex.Reactive.Extensions;
using System;
using System.Reactive.Linq;

namespace CounterApp
{
    public class MainViewModel
    {
        private readonly Counter Model = new Counter();

        // Activityに公開するカウント値
        public ReactiveProperty<string> CountMessage { get; private set; }

        // インクリメントを行うためのコマンド
        public ReactiveCommand IncrCommand { get; private set; }

        public MainViewModel()
        {
            // model -> rxpropへのOneWayバインディング
            this.CountMessage = this.Model
                .ObserveProperty(c => c.Count)
                .Select(i => string.Format("{0} click!", i))
                .ToReactiveProperty();

            // コマンドが実行されたらModelのIncrメソッドを実行する
            this.IncrCommand = new ReactiveCommand();
            this.IncrCommand.Subscribe(_ => this.Model.Incr());
        }
    }
}
Activityの作成
MainActivityのコードをひな形から修正します。
// バインディング用メソッドが定義されてる名前空間
using Codeplex.Reactive.Binding;

using System;

using Android.App;
using Android.Content;
using Android.Runtime;
using Android.Views;
using Android.Widget;
using Android.OS;

namespace CounterApp
{
    [Activity(Label = "CounterApp", MainLauncher = true, Icon = "@drawable/icon")]
    public class MainActivity : Activity
    {
        // ViewModel
        private readonly MainViewModel DataContext = new MainViewModel();

        protected override void OnCreate(Bundle bundle)
        {
            base.OnCreate(bundle);

            // Set our view from the "main" layout resource
            SetContentView(Resource.Layout.Main);

            // Get our button from the layout resource,
            // and attach an event to it
            var button = FindViewById<Button>(Resource.Id.MyButton);

            // CountMessageをbuttonのTextプロパティへバインド
            this.DataContext.CountMessage.BindTo(button, b => b.Text);

            // コマンドをイベントハンドラに変換してボタンと紐づける
            button.Click += this.DataContext.IncrCommand.ToEventHandler();
        }
    }
}
ReactivePropertyを通常のプロパティにバインドするためのBindToという拡張メソッドが、Codeplex.Reactive.Binding名前空間に用意されているので、それを使ってButtonのTextと紐付けを行います。
コマンドはToEventHandlerという拡張メソッドでイベントハンドラへ変換する拡張メソッドが、同じくCodeplex.Reactive.Binding名前空間に用意されてるので、それを使ってButtonのClickイベントと紐づけます。
実行して動作確認
MonoForAndroid_API_15のエミュレータを起動してじっくりと配備を行います。ここらへん実機がほしくなりますね…。
実行すると以下のような画面が表示されます。

ボタンを押すとカウントアップされていきます。

まとめ
簡単なサンプルレベルでしか試していませんが、とりあえず動く…!ということでReactivePropertyをよろしくお願いいたします。