Ignite UIの正しい使い方がわかった!ということで使い始めるまでの手順をメモっておこうと思います。
プロジェクトの作成
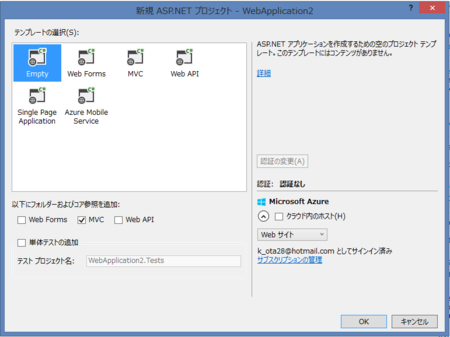
ASP.NETの空のプロジェクトをMVCにチェックを入れて作成します。

ASP.NET MVCのコントローラを作成します。ここではHomeControllerという名前で作成しました。Indexアクションに対してViewを作成します。Indexメソッドで右クリックしてViewを追加するとレイアウトページ等も作ってくれるのでお勧めです。
Ignite UIの取り込み
C:\Program Files (x86)\Infragistics\2015.1\Ignite UI\MVC\MVC5\Binにある以下のファイルを参照に追加します。
- Infragistics.Olap.DataProvider.Adomd.Mvc.dll
- Infragistics.Web.Mvc.dll
- Infragistics.Web.Mvc.Mobile.dll
追加したら参照のプロパティでローカルコピーをTrueに変更します。
JavaScript/CSSの取り込み
次に、C:\Program Files (x86)\Infragistics\2015.1\Ignite UIにあるJavaScriptとCSSを取り込みます。
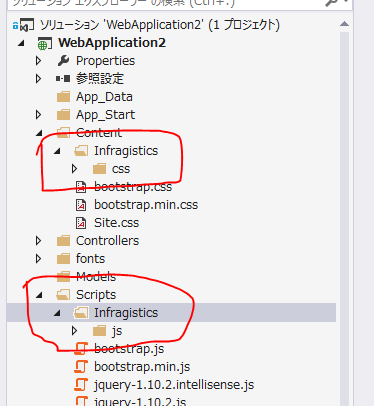
Contentフォルダ以下にInfragisticsという名前のフォルダを作って、そこにcssフォルダをコピーします。次にScriptsフォルダの下にInfragisticsという名前のフォルダを作ってjsフォルダをコピーします。

関連ライブラリをNuGetから取り込む
jQuery UIが必要になるのでNuGetからjQuery UIを追加します。
レイアウトファイルにJSを追加
_Layout.cshtmlを以下のように修正します。ポイントはscriptタグを全部headに持ってくることです。そして、jqueryuiと、Infragistics.loader.jsも追加します。
<!DOCTYPE html> <html> <head> <meta charset="utf-8" /> <meta name="viewport" content="width=device-width, initial-scale=1.0"> <title>@ViewBag.Title - My ASP.NET Application</title> <link href="~/Content/Site.css" rel="stylesheet" type="text/css" /> <link href="~/Content/bootstrap.min.css" rel="stylesheet" type="text/css" /> <script src="~/Scripts/modernizr-2.6.2.js"></script> <script src="~/Scripts/jquery-1.10.2.min.js"></script> <script src="~/Scripts/bootstrap.min.js"></script> <script src="~/Scripts/jquery-ui-1.11.4.min.js"></script> <script src="~/Scripts/Infragistics/js/infragistics.loader.js"></script> </head> <body> <div class="navbar navbar-inverse navbar-fixed-top"> <div class="container"> <div class="navbar-header"> <button type="button" class="navbar-toggle" data-toggle="collapse" data-target=".navbar-collapse"> <span class="icon-bar"></span> <span class="icon-bar"></span> <span class="icon-bar"></span> </button> @Html.ActionLink("Application name", "Index", "Home", new { area = "" }, new { @class = "navbar-brand" }) </div> <div class="navbar-collapse collapse"> <ul class="nav navbar-nav"> </ul> </div> </div> </div> <div class="container body-content"> @RenderBody() <hr /> <footer> <p>© @DateTime.Now.Year - My ASP.NET Application</p> </footer> </div> </body> </html>
あとは使うだけ
あとはヘルプを見て使います。例としてGridを使ってみます。以下のようなPersonクラスを定義して、それのIQueryableをModelに渡します。(GridがIQueryableを欲しがるため)
using System;
using System.Collections.Generic;
using System.Linq;
using System.Web;
using System.Web.Mvc;

namespace WebApplication2.Controllers
{
    public class HomeController : Controller
    {
        // GET: Home
        public ActionResult Index()
        {
            return View(Enumerable.Range(1, 1000).Select(x => new Person { Name = "okazuki" + x, Age = x }).AsQueryable());
        }
    }

    public class Person
    {
        public string Name { get; set; }
        public int Age { get; set; }
    }
}
Index.cshtmlにInfragistics.Web.Mvcのusingを追加して以下のようなコードを書きます。
@using Infragistics.Web.Mvc
@model IQueryable<WebApplication2.Controllers.Person>

@{
    ViewBag.Title = "Index";
}
@* スクリプトとCSSの動的読み込みのためのおまじない *@
@(Html.Infragistics()
    .Loader()
    .CssPath(Url.Content("~/Content/Infragistics/css"))
    .ScriptPath(Url.Content("~/Scripts/Infragistics/js"))
    .Render())

<h2>Index</h2>

@* Gridコントロール *@
@(Html.Infragistics()
    .Grid<WebApplication2.Controllers.Person>()
    .ID("sampleGrid")
    .Width("100%")
    .Height("400px")
    .AutoGenerateColumns(false)
    .Columns(column =>
    {
        column.For(x => x.Name).HeaderText("名前");
        column.For(x => x.Age).HeaderText("年齢");
    })
    .DataSource(this.Model)
    .DataBind()
    .Render())
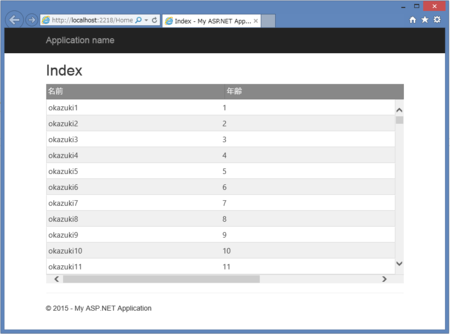
実行すると以下のようになります。

個人的にはまったところ
ScriptとCSSを動的に読み込むLoaderのコードをsectionを作ってその中で書いたりしてました。以下のような感じで。
@section scripts {
@(Html.Infragistics()
    .Loader()
    .CssPath(Url.Content("~/Content/Infragistics/css"))
    .ScriptPath(Url.Content("~/Scripts/Infragistics/js"))
    .Render())
}
section内に書くと、うまいことGridとかと連携してくれないみたいで、それでずっとはまってました。わかってしまえば、簡単なことなんですが…。
まとめ
これで、Ignite UIを使うための準備は整ったので、あとはどんなコントロールがあるのか勉強するだけだ!(そこが大変)