過去記事
- Azure Mobile AppsでUWPを作ってみよう - かずきのBlog@hatena
- Azure Mobile AppsでUWPを作ってみよう「手組編」 - かずきのBlog@hatena
- Azure Mobile AppsでUWPを作ってみよう「同期編」 - かずきのBlog@hatena
- Azure Mobile AppsでUWPを作ってみよう「プッシュ通知編」 - かずきのBlog@hatena
あらすじ
UWPの次はXamarin.Formsだぜ。ただし、Androidに限る(Mac持ってない)
Xamarin.Formsプロジェクトの作成
Todoアプリのひな型を落としてきてもいいですが、せっかくなので1から作ってみようと思います。 Xamarin.Formsのプロジェクトを作ります。せっかくなのでPrism.Formsのプロジェクトを作りましょう。以下の拡張機能を入れると作れるようになります。
visualstudiogallery.msdn.microsoft.com
プロジェクトを作ったらNuGetから全プロジェクトにMicrosoft.Azure.Mibole.Clientを追加します。
App.xaml.csでMobileServiceClientクラスをUnityのDIコンテナに登録します。
using Microsoft.WindowsAzure.MobileServices;
using Prism.Unity;
using PrismUnityApp28.Views;
using Microsoft.Practices.Unity;
using System.Net.Http;

namespace PrismUnityApp28
{
    public partial class App : PrismApplication
    {
        public App(IPlatformInitializer initializer = null) : base(initializer) { }

        protected override async void OnInitialized()
        {
            InitializeComponent();
            await this.NavigationService.NavigateAsync("MainPage");
        }

        protected override void RegisterTypes()
        {
            this.Container.RegisterType<MobileServiceClient>(
                new ContainerControlledLifetimeManager(),
                new InjectionConstructor("http://customokazukitodoapp.azurewebsites.net", new HttpMessageHandler[0]));
            this.Container.RegisterTypeForNavigation<MainPage>();
        }
    }
}
TodoItemテーブルに対応するModelクラスを作ります。
namespace PrismUnityApp28.Models
{
    public class TodoItem
    {
        public string Id { get; set; }

        public string Text { get; set; }

        public override string ToString()
        {
            return this.Text;
        }
    }
}
そして、MainPageViewModelを作りこんでいきます。 画面遷移してきたときにデータの読み込みと、AddCommandを実行されたときに入力値をもとにデータを登録して再度サーバーから最新データを取得しています。
using Microsoft.WindowsAzure.MobileServices;
using Prism.Commands;
using Prism.Mvvm;
using Prism.Navigation;
using PrismUnityApp28.Models;
using System.Collections.ObjectModel;

namespace PrismUnityApp28.ViewModels
{
    public class MainPageViewModel : BindableBase, INavigationAware
    {
        private MobileServiceClient Client { get; }

        private ObservableCollection<TodoItem> todoItems;

        public ObservableCollection<TodoItem> TodoItems
        {
            get { return this.todoItems; }
            set { this.SetProperty(ref this.todoItems, value); }
        }

        private string input;

        public string Input
        {
            get { return this.input; }
            set { this.SetProperty(ref this.input, value); }
        }

        public DelegateCommand AddCommand { get; }

        public MainPageViewModel(MobileServiceClient client)
        {
            this.Client = client;
            this.AddCommand = new DelegateCommand(async () =>
            {
                await this.Client.GetTable<TodoItem>().InsertAsync(new TodoItem { Text = this.Input });
                this.Input = "";
                this.TodoItems = new ObservableCollection<TodoItem>(await this.Client.GetTable<TodoItem>().CreateQuery().ToListAsync());
            });
        }

        public void OnNavigatedFrom(NavigationParameters parameters)
        {
        }

        public async void OnNavigatedTo(NavigationParameters parameters)
        {
            this.TodoItems = new ObservableCollection<TodoItem>(await this.Client.GetTable<TodoItem>().CreateQuery().ToListAsync());
        }
    }
}
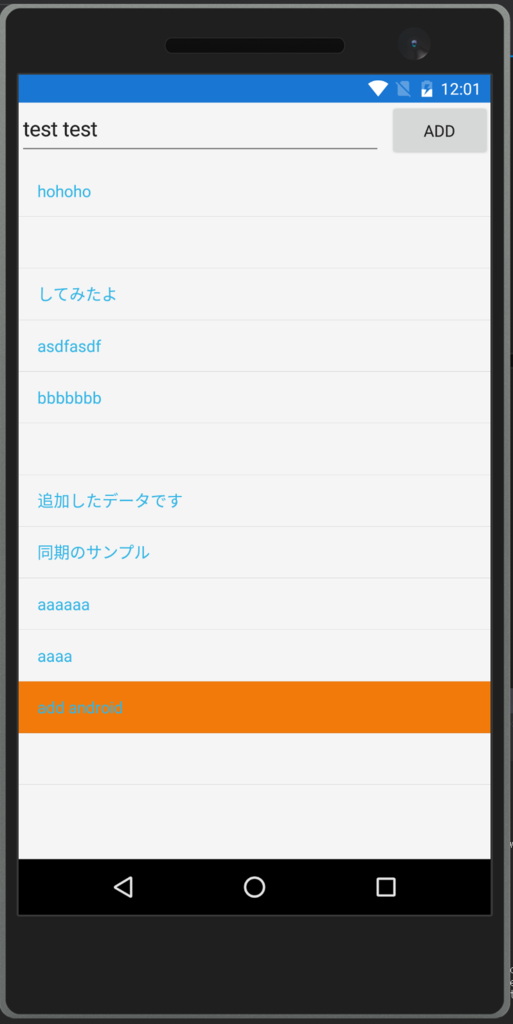
画面はこんな感じででっち上げました。
<?xml version="1.0" encoding="utf-8" ?>
<ContentPage xmlns="http://xamarin.com/schemas/2014/forms"
             xmlns:x="http://schemas.microsoft.com/winfx/2009/xaml"
             xmlns:prism="clr-namespace:Prism.Mvvm;assembly=Prism.Forms"
             prism:ViewModelLocator.AutowireViewModel="True"
             x:Class="PrismUnityApp28.Views.MainPage"
             Title="MainPage">
  <Grid>
    <Grid.RowDefinitions>
      <RowDefinition Height="Auto" />
      <RowDefinition />
    </Grid.RowDefinitions>
    <StackLayout Orientation="Horizontal">
      <Entry HorizontalOptions="FillAndExpand"
             Text="{Binding Input, Mode=TwoWay}"/>
      <Button Text="Add"
              Command="{Binding AddCommand}"/>
    </StackLayout>
    <ListView Grid.Row="1"
              ItemsSource="{Binding TodoItems}" />
  </Grid>
</ContentPage>
実行すると以下のようになります。

まとめ
AndroidでもUWPと同じ要領で使えるのでとても簡単でした。 Prismとの統合もできたしあとはゴリゴリ作っていくだけですね。(通知と、認証はOSごとの実装が必要だけど)