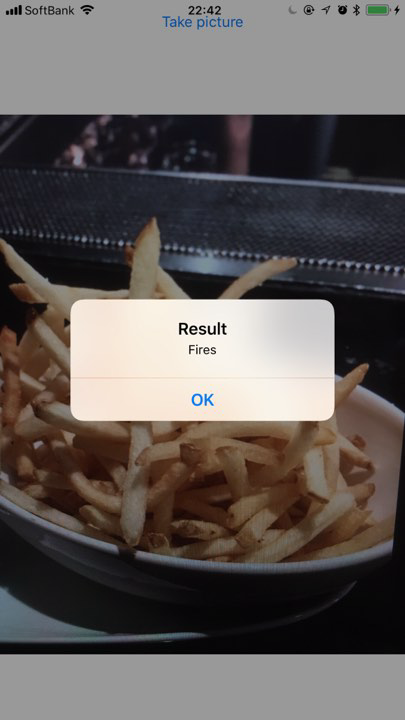
なんか iOS 11 から CoreML ってのが使えて簡単にいうと機械学習の学習結果を iOS ローカルで動かせるぜ!っていう感じのものらしいですね。強い。
ということで、Apple Developer と Xamarin のドキュメントを見ながら試してみたいと思います。
Core ML | Apple Developer Documentation
ちなみに、CoreML で使える学習結果のファイルは、Cognitive Services の Custo Vision API で作れるということなので、今回はこれも使ってみたいと思います。
Custom Vision API でいい感じの画像データを用意するのがめんどくさかったので、Drew さんの作ってくれた、このハンズオンにある画像をそのまま使いたいと思います。
customvision.ai
ではさくっと Custom Visoin を使えるようにしましょう。本題じゃないので注意点だけを。
Custom Vision のサイトでプロジェクトを作るときに General (compact) を使うことです。これをしないと CoreML で使えるファイルをエクスポートできません。

あとは、Drew さんのリポジトリにある画像を適当に投げ込んで Fries / Not Fries のカテゴリを作って学習させます。
学習させたら下の青で囲ったエクスポートボタンを押します。

こんな画面になるので、あとは支持に従うだけです。mlmodel という拡張子のファイルが取得できます。

次の作業環境は Mac です。以下のコマンドをターミナルでうちます。
xcrun coremlcompiler compile さっきダウンロードしたファイル.mlmodel 出力先フォルダ
出来上がったファイルをどうにかして Windows にもっていきましょう。
Xamarin.iOS で頑張る
とりあえず、Xamarin.Forms でプロジェクトを作って iOS プロジェクトだけで動くように作りたいと思います。先ほどのコマンドでできた一連のファイルを iOS プロジェクトの Resources フォルダに移動させます。

ClreML を使って認識をしてくれるであろう処理のためのインターフェースを PCL プロジェクトに作ります。
using System;
using System.Collections.Generic;
using System.Linq;
using System.Text;
using System.Threading.Tasks;

namespace CoreMLLabApp
{
    public interface IFriesOrNotFriesService
    {
        Task<string> DetectAsync(byte[] image);
    }
}
そして、MainPage.xaml を以下のような感じにします。
<?xml version="1.0" encoding="utf-8" ?>
<ContentPage xmlns="http://xamarin.com/schemas/2014/forms"
             xmlns:x="http://schemas.microsoft.com/winfx/2009/xaml"
             xmlns:local="clr-namespace:CoreMLLabApp"
             x:Class="CoreMLLabApp.MainPage">
    <ContentPage.Padding>
        <OnPlatform x:TypeArguments="Thickness">
            <On Platform="iOS">0,20,0,0</On>
        </OnPlatform>
    </ContentPage.Padding>
    <Grid>
        <Grid.RowDefinitions>
            <RowDefinition Height="Auto" />
            <RowDefinition />
        </Grid.RowDefinitions>

        <Button Text="Take picture"
            Clicked="Button_Clicked" />

        <Image x:Name="image"
               HorizontalOptions="Fill"
               VerticalOptions="Fill"
               Grid.Row="1" />
    </Grid>
</ContentPage>
そして、カメラから画像をとりたいので Xam.Plugin.Media を導入して表示される readme.txt の内容に従って info.plist に設定を追加したら MainPage.xaml.cs を以下のようにします。
using Plugin.Media;
using Plugin.Media.Abstractions;
using System;
using System.IO;
using Xamarin.Forms;

namespace CoreMLLabApp
{
    public partial class MainPage : ContentPage
    {
        public MainPage()
        {
            InitializeComponent();
        }

        private async void Button_Clicked(object sender, EventArgs e)
        {
            await CrossMedia.Current.Initialize();

            var file = await CrossMedia.Current.TakePhotoAsync(new StoreCameraMediaOptions());
            if (file == null) { return; }

            this.image.Source = ImageSource.FromStream(() => file.GetStream());

            using (var fs = file.GetStream())
            using (var ms = new MemoryStream())
            {
                await fs.CopyToAsync(ms);
                var d = DependencyService.Get<IFriesOrNotFriesService>();
                var result = await d.DetectAsync(ms.ToArray());
                await this.DisplayAlert("Result", result, "OK");
            }
        }
    }
}
ここまでは、ただの Xamarin.Forms ですね。
CoreML を使ってみよう
では、iOS プロジェクトに FriesOrNotFriesService.cs を追加して処理を書いていきます。サンプルプロジェクトとかを参考に以下のように書いてみました。
using System;
using System.Linq;
using System.Threading.Tasks;
using Foundation;
using Vision;
using CoreML;
using CoreImage;
using CoreFoundation;

[assembly: Xamarin.Forms.Dependency(typeof(CoreMLLabApp.iOS.FriesOrNotFriesService))]
namespace CoreMLLabApp.iOS
{
    public class FriesOrNotFriesService : IFriesOrNotFriesService
    {
        private static VNCoreMLModel VModel { get; }

        static FriesOrNotFriesService()
        {
            // Load the ML model
            var assetPath = NSBundle.MainBundle.GetUrlForResource("e3e4e645c0944c6ca84f9a000e501b22", "mlmodelc");
            var friedOrNotFriedModel = MLModel.Create(assetPath, out _);
            VModel = VNCoreMLModel.FromMLModel(friedOrNotFriedModel, out _);
        }

        public Task<string> DetectAsync(byte[] image)
        {
            var taskSource = new TaskCompletionSource<string>();
            void handleClassification(VNRequest request, NSError error)
            {
                var observations = request.GetResults<VNClassificationObservation>();
                if (observations == null)
                {
                    taskSource.SetException(new Exception("Unexpected result type from VNCoreMLRequest"));
                    return;
                }

                if (observations.Length == 0)
                {
                    taskSource.SetResult(null);
                    return;
                }

                var best = observations.First();
                taskSource.SetResult(best.Identifier);
            }

            using (var data = NSData.FromArray(image))
            {
                var ciImage = new CIImage(data);
                var handler = new VNImageRequestHandler(ciImage, new VNImageOptions());
                DispatchQueue.DefaultGlobalQueue.DispatchAsync(() =>
                {
                    handler.Perform(new VNRequest[] { new VNCoreMLRequest(VModel, handleClassification) }, out _);
                });
            }

            return taskSource.Task;
        }

    }
}
byte[] から CoreML の入力として渡すための CIImage に変換して認識処理を呼び出しています。
動かして動作確認
ふむ。とりあえず動くっぽい。


あとは、DependencyService で Android や UWP の時には、CustomVision の API をたたくように仕込めば iOS だけ CoreML で他は REST API みたいなことが出来ますね。
ソースコードは以下に置いています。