Prismをダウンロードして、MVVMのサンプル実装を見てるとMVVMパターンなのにダイアログ出したりしてたので、どうやってるか見てみたら、便利なクラスが用意されてました。
定義されているアセンブリは
- Microsoft.Practices.Prism.Interactivity.dll
です。
使うのは
- IInteractionRequestインターフェース
- InteractionRequest
クラス(IInteractionRequestの実装) - Notificationクラス(TitleとContentだけを持つシンプルなクラス)
- Confirmationクラス(Notificationクラスを拡張したもの)
- InteractionRequestTrigger
です。
IInteractionRequestは、Raisedイベントを定義しているだけのシンプルなインターフェースです。InteractionRequest
Raiseメソッドは、Notificationクラス(または、そのサブクラス)とコールバックメソッドを渡します。
コールバックメソッドで、View側でダイアログとかが表示された後の処理をやるという雰囲気です。説明難しいので、適当に実装してみました。
まずは、ViewModelです。ここでさっき紹介したInteractionRequestクラスを使ってます。AlertCommandでボタンが押された時の処理を定義して、AlertメソッドでInteractionRequestを使っていったんViewに制御を渡しています。
namespace WpfApplication17
{
    using System.Diagnostics;
    using System.Windows.Input;
    using Microsoft.Practices.Prism.Commands;
    using Microsoft.Practices.Prism.Interactivity.InteractionRequest;
    using Microsoft.Practices.Prism.ViewModel;

    // PrismのMVVMのベースクラスとして使えるINotifyPropertyChangedの実装クラスを使う
    public class MainWindowViewModel : NotificationObject
    {
        // これが今回の肝
        private InteractionRequest<Confirmation> alertRequest;

        // DelegateCommandもPrismに定義されてる
        private DelegateCommand alertCommand;

        private string message;

        public MainWindowViewModel()
        {
            this.alertRequest = new InteractionRequest<Confirmation>();
            this.alertCommand = new DelegateCommand(Alert);
        }

        public IInteractionRequest AlertRequest { get { return alertRequest; } }

        public ICommand AlertCommand { get { return this.alertCommand; } }

        // ただのメッセージを表すプロパティ
        public string Message
        {
            get
            {
                return this.message;
            }

            set
            {
                this.message = value;
                // Expressionを渡すタイプのRaisePropertyChangedメソッドも定義されてる
                this.RaisePropertyChanged(() => Message);
            }
        }

        private void Alert()
        {
            // Viewにリクエストを投げる
            alertRequest.Raise(
                new Confirmation { Title = "こんにちは", Content = "Hello world" },
                // コールバックで続きの処理をやる
                n =>
                {
                    // コールバックで結果を受け取り処理ができる
                    this.Message = n.Confirmed ? "OKが押されました" : "キャンセルが押されました";
                });
        }
    }
}
次にView側です。View側では、ViewModelで公開しているAlertRequestプロパティのRaisedイベントに対応するトリガーとアクションの定義を行っているところがポイントになります。
<Window x:Class="WpfApplication17.MainWindow"
        xmlns="http://schemas.microsoft.com/winfx/2006/xaml/presentation"
        xmlns:x="http://schemas.microsoft.com/winfx/2006/xaml"
        xmlns:i="http://schemas.microsoft.com/expression/2010/interactivity"
        xmlns:ei="http://schemas.microsoft.com/expression/2010/interactions"
        xmlns:l="clr-namespace:WpfApplication17"
        xmlns:prism="http://www.codeplex.com/prism"
        Title="MainWindow" Height="350" Width="525">
    <Window.DataContext>
        <!-- ViewModelをDataContextに差し込む -->
        <l:MainWindowViewModel />
    </Window.DataContext>
    <i:Interaction.Triggers>
        <!-- InteractionRequestのRaisedイベントに対応するためのTrigger -->
        <prism:InteractionRequestTrigger SourceObject="{Binding AlertRequest}">
            <!-- ちょっと残念なのが自作のActionでView側の処理を記述しないといけないこと・・・ -->
            <l:ConfirmAction />
        </prism:InteractionRequestTrigger>
    </i:Interaction.Triggers>

    <StackPanel>
        <!-- 普通の画面なので説明は割愛 -->
        <Button Content="Alert" Command="{Binding AlertCommand}" />
        <TextBlock Text="{Binding Message}" />
    </StackPanel>
</Window>
Triggerに対応する自作のActionは、以下のような感じになっています。
namespace WpfApplication17
{
    using System.Windows;
    using System.Windows.Interactivity;
    using Microsoft.Practices.Prism.Interactivity.InteractionRequest;

    public class ConfirmAction : TriggerAction<DependencyObject>
    {
        protected override void Invoke(object parameter)
        {
            // イベント引数とContextを取得する
            var args = parameter as InteractionRequestedEventArgs;
            var ctx = args.Context as Confirmation;

            // ContextのConfirmedに結果を格納する
            ctx.Confirmed = MessageBox.Show(
                args.Context.Content.ToString(),
                args.Context.Title,
                MessageBoxButton.OKCancel) == MessageBoxResult.OK;

            // コールバックを呼び出す
            args.Callback();
        }
    }
}
このActionは、Silverlight側には自前で用意しなくてもいいように汎用的な実装が含まれていましたが残念ながらWPFには汎用的な実装は含まれていませんでした。まぁ、ちょっと頑張れば汎用的な実装はすぐ出来そうです。
(なので、最初から用意しておいてほしかったなぁ・・・)
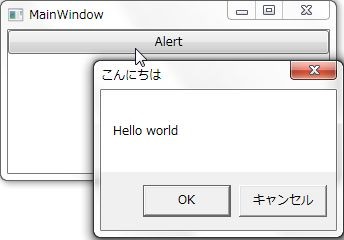
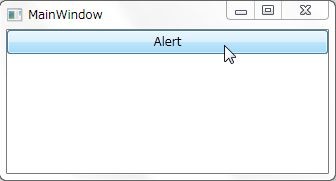
ボタンを押すとViewModelのAlertCommandが実行されてAlertメソッドに処理がうつります。そして、Alertの中でRaisedイベントが発行されてViewに定義されているトリガーが起動してConfirmActionのInvokeに処理が移ります。(ここでメッセージボックスが出る)

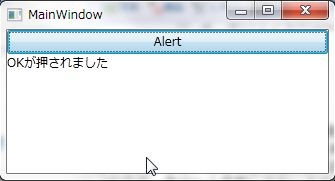
そして、メッセージボックスのボタンを押すと、ConfimationのConfirmedプロパティに値が格納され、コールバックが呼ばれます。コールバックでは、Confimationクラスを介してView側での選択状況を取得できます。(ここではメッセージに、どのボタンが押されたのかを表示させてます)

テスト時には、InteractionRequestのRaisedイベントを適当に購読して適当な値を結果として詰め込んでコールバックするだけでいいのでテストも問題なさそうです。
このプログラムは以下からダウンロードできます。
PrismMVVMConfirm.zip
BlendのSDKとPrism 4のDrop9をインストールすれば動くと思います。
