Prism for WinRTとReactivePropertyの連携書いてみたので、WPFのPrism5での使用方法について書いてみようと思います。
参照についかするもの
以下のライブラリをNuGetから追加します。
- ReactiveProperty
- Prism.Mvvm
- Prism.Interactivity
続いて、以下のアセンブリを参照設定から追加します。
- System.Windows.Interactivity
- Microsoft.Expression.Interactions
IInteractionRequestインターフェースの独自実装
ReactivePropertyになじむように、PrismのデフォルトのIInteractionRequestの実相ではなく、自前のTaskベースの実装を行います。といってもコールバックで受けてた続きの処理をTaskにするだけなので、そんなに難しくないです。
using Microsoft.Practices.Prism.Interactivity.InteractionRequest;
using System;
using System.Threading.Tasks;

namespace PrismRxApp.Mvvm
{
    // コールバックではなくTaskで続きの処理を受け取るようにする
    public sealed class AsyncInteractionRequest<T> : IInteractionRequest
        where T : INotification
    {
        public event EventHandler<InteractionRequestedEventArgs> Raised;
        private void OnRaised(InteractionRequestedEventArgs e)
        {
            var h = this.Raised;
            if (h != null)
            {
                h(this, e);
            }
        }

        public Task<T> RaiseAsync(T context)
        {
            var source = new TaskCompletionSource<T>();
            this.OnRaised(new InteractionRequestedEventArgs(context, () => source.SetResult(context)));
            return source.Task;
        }
    }
}
PrismのMessengerであるInteractionRequestは、IInteractionRequestを実装していれば何でもよくて、守るべき約束事はRaisedイベントを適時発行することだけです。なので、こういう風にTaskにくるんでやるのも楽でいいです。ここらへんの抽象化のさじ加減は、いい感じだなと思います。
アプリの作成
では、カウンターアプリでも作ってみようと思います。今回のカウンターは0より小さい値にはカウントダウンできない。10より大きい値は危険という感じのカウンターにしようと思います。危険な値でカウントアップする場合は、確認ダイアログを出そうと思います。
Modelの作成
ということでカウンタークラスを作成します。ちょっと条件が複雑になってきたのでコード長くなりますね。サンプルにしては。
using Microsoft.Practices.Prism.Mvvm;
using System;

namespace PrismRxApp.Models
{
    // 0以下にならない、10以上になると危険フラグがONになるカウンタクラス
    public class Counter : BindableBase
    {
        private int count;

        public int Count
        {
            get { return this.count; }
            private set { this.SetProperty(ref this.count, value); }
        }

        private bool isDanger;

        public bool IsDanger
        {
            get { return this.isDanger; }
            private set { this.SetProperty(ref this.isDanger, value); }
        }

        private bool canDecrement;

        public bool CanDecrement
        {
            get { return this.canDecrement; }
            set { this.SetProperty(ref this.canDecrement, value); }
        }


        public void Increment()
        {
            this.Count++;
            this.UpdateState();
        }

        public void Decrement()
        {
            if (!this.CanDecrement)
            {
                throw new InvalidOperationException();
            }

            this.Count--;
            this.UpdateState();
        }

        private void UpdateState()
        {
            this.IsDanger = this.Count >= 10;
            this.CanDecrement = this.Count > 0;
        }
    }
}
ViewModelの作成
次に、ViewModelの作成です。こいつは、Incrementコマンド実行の処理がIsDangerがtrueのときはInteractionRequestを通じてViewに確認要求を出して、IsDangerがfalseのときは素通りして、CounterクラスのIncrementを呼び出すという点以外は特筆すべき点はないと思います。
using Codeplex.Reactive;
using Codeplex.Reactive.Extensions;
using Microsoft.Practices.Prism.Interactivity.InteractionRequest;
using PrismRxApp.Models;
using PrismRxApp.Mvvm;
using System;
using System.Reactive.Linq;
using System.Reactive.Threading.Tasks;

namespace PrismRxApp.ViewModels
{
    public class MainWindowViewModel
    {
        private readonly Counter Model = new Counter();

        // 画面に出力するメッセージ
        public ReactiveProperty<string> Message { get; private set; }

        // インクリメントに確認が必要な時にVに確認要求を投げるInteractionRequest
        public AsyncInteractionRequest<Confirmation> IncrementConfirmationRequest { get; private set; }

        // カウンターをインクリメントする
        public ReactiveCommand IncrementCommand { get; private set; }

        // カウンターをデクリメントする
        public ReactiveCommand DecrementCommand { get; private set; }

        public MainWindowViewModel()
        {
            // メッセージはカウンターの値を適当にフォーマッティングしたもの
            this.Message = this.Model
                .ObserveProperty(o => o.Count)
                .Select(i => string.Format("Counter value: {0}", i))
                .ToReactiveProperty();

            this.IncrementConfirmationRequest = new AsyncInteractionRequest<Confirmation>();

            this.IncrementCommand = new ReactiveCommand();
            this.IncrementCommand
                .SelectMany(
                    _ => Observable.If(
                        // インクリメントするのが危険なら
                        () => this.Model.IsDanger,
                        // 確認した結果のIO<bool>を返す
                        Observable.Defer(() =>
                            this.IncrementConfirmationRequest
                                .RaiseAsync(new Confirmation { Title = "confirmation", Content = "Increment?" })
                                .ToObservable()
                                .Select(c => c.Confirmed)
                        ),
                        // 普段は、trueを流す
                        Observable.Return(true)
                    )
                )
                // 結果がtrueの場合だけインクリメントする
                .Where(b => b)
                .Subscribe(_ =>
                {
                    this.Model.Increment();
                });

            // デクリメント可能なときだけデクリメントする
            this.DecrementCommand = this.Model.ObserveProperty(o => o.CanDecrement).ToReactiveCommand();
            this.DecrementCommand.Subscribe(_ => this.Model.Decrement());

        }
    }
}
Viewの作成
Viewは、Prismの命名規約にしたがって自動でViewModelをDataContextに紐づけるためにIViewを実装して、ViewModelLocationProviderを使ってDataContextの設定を行うようにしています。
using Microsoft.Practices.Prism.Mvvm;
using System.Windows;

namespace PrismRxApp.Views
{
    /// <summary>
    /// MainWindow.xaml の相互作用ロジック
    /// </summary>
    public partial class MainWindow : Window, IView
    {
        public MainWindow()
        {
            InitializeComponent();
            ViewModelLocationProvider.AutoWireViewModelChanged(this);
        }
    }
}
あとは、ちゃちゃっとXAML。ボタン2個とメッセージ表示用のテキストボックス。あとは、VMからの要求にこたえて確認ダイアログを出すBehaviorを仕込んでおきます。
<Window
    xmlns="http://schemas.microsoft.com/winfx/2006/xaml/presentation"
    xmlns:x="http://schemas.microsoft.com/winfx/2006/xaml"
    xmlns:d="http://schemas.microsoft.com/expression/blend/2008"
    xmlns:mc="http://schemas.openxmlformats.org/markup-compatibility/2006"
    xmlns:ViewModels="clr-namespace:PrismRxApp.ViewModels"
    xmlns:i="http://schemas.microsoft.com/expression/2010/interactivity"
    xmlns:Custom="http://www.codeplex.com/prism"
    mc:Ignorable="d"
    x:Class="PrismRxApp.Views.MainWindow"
    Title="MainWindow"
    Height="300" Width="300"
    d:DataContext="{d:DesignInstance {x:Type ViewModels:MainWindowViewModel}, IsDesignTimeCreatable=True}">
    <i:Interaction.Triggers>
        <Custom:InteractionRequestTrigger SourceObject="{Binding IncrementConfirmationRequest, Mode=OneWay}">
            <Custom:PopupWindowAction IsModal="True" CenterOverAssociatedObject="True" />
        </Custom:InteractionRequestTrigger>
    </i:Interaction.Triggers>
    <Grid>
        <Grid.ColumnDefinitions>
            <ColumnDefinition Width="145*"/>
            <ColumnDefinition Width="147*"/>
        </Grid.ColumnDefinitions>
        <Grid.RowDefinitions>
            <RowDefinition Height="Auto"/>
            <RowDefinition Height="Auto"/>
            <RowDefinition/>
        </Grid.RowDefinitions>
        <Button Content="Increment" Grid.Row="1" Margin="5" Command="{Binding IncrementCommand, Mode=OneWay}"/>
        <Button Content="Decrement" Grid.Column="1" Grid.Row="1" Margin="5" Command="{Binding DecrementCommand, Mode=OneWay}"/>
        <TextBlock Grid.ColumnSpan="2" TextWrapping="Wrap" Text="{Binding Message.Value}" Margin="5"/>
    </Grid>
</Window>
Prism 5から、PopupWindowActionというActionが追加されて、こいつがNotificationとConfirmationに対するデフォルトのWindowを表示する機能を持ってるので積極的に使っていきます。状況に応じてカスタムのWindowを出す機能もあります(使ったことないけど)
実行
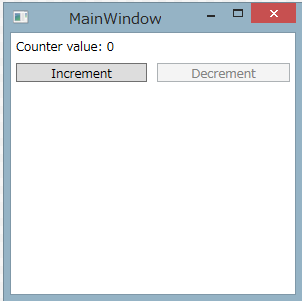
実行してみます。カウンタ値が最初0なのでインクリメントだけできる画面が出てきます。

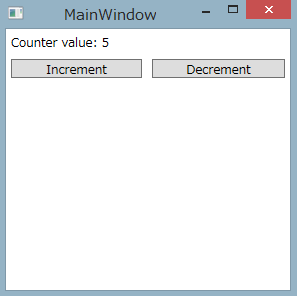
インクリメントボタンを押していくとデクリメントもできるようになります。

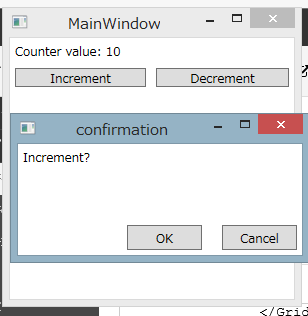
10以上でIncrementをすると確認ダイアログが出てきます。

OKを押すとカウントアップされて、Cancelを押すとカウントアップされません。
プロジェクトファイル
一応プロジェクトは以下からダウンロードできます。